微信公众号:OpenCV学堂
关注获取更多计算机视觉与深度学习知识
从低分辨率图象恢复成为一个高分辨率图象,采用卷积神经网络、根据高分辨率图象降采样得到低分辨率图象,然后通过网络训练计算MSE的像素 损失,完成图象重建,最终得到训练之后的模型。模型结构如下:

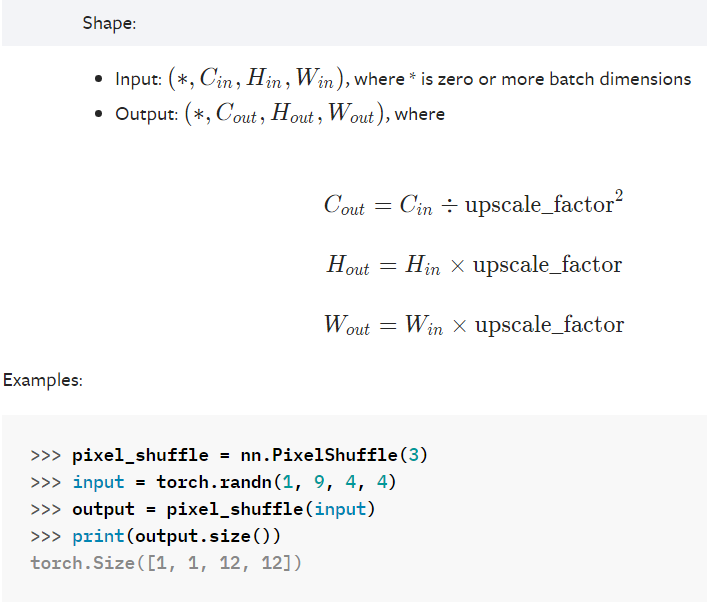
其中亚像素卷积的公式如下:

Pytorch中模型代码实现如下:
# Super Resolution model definition in PyTorch
import torch.nn as nn
import torch.nn.init as init


class SuperResolutionNet(nn.Module):
    def __init__(self, upscale_factor, inplace=False):
        super(SuperResolutionNet, self).__init__()

        self.relu = nn.ReLU(inplace=inplace)
        self.conv1 = nn.Conv2d(1, 64, (5, 5), (1, 1), (2, 2))
        self.conv2 = nn.Conv2d(64, 64, (3, 3), (1, 1), (1, 1))
        self.conv3 = nn.Conv2d(64, 32, (3, 3), (1, 1), (1, 1))
        self.conv4 = nn.Conv2d(32, upscale_factor ** 2, (3, 3), (1, 1), (1, 1))
        self.pixel_shuffle = nn.PixelShuffle(upscale_factor)

        self._initialize_weights()

    def forward(self, x):
        x = self.relu(self.conv1(x))
        x = self.relu(self.conv2(x))
        x = self.relu(self.conv3(x))
        x = self.pixel_shuffle(self.conv4(x))
        return x

    def _initialize_weights(self):
        init.orthogonal_(self.conv1.weight, init.calculate_gain('relu'))
        init.orthogonal_(self.conv2.weight, init.calculate_gain('relu'))
        init.orthogonal_(self.conv3.weight, init.calculate_gain('relu'))
        init.orthogonal_(self.conv4.weight)

# Create the super-resolution model by using the above model definition.
torch_model = SuperResolutionNet(upscale_factor=3)torch.nn.PixelShuffle(upscale_factor)

首先通过pytorch的model zoo工具下载训练好的模型,然后转换为ONNX格式文件,通过onnxruntime调用。输入一张低分辨率图象,得到一张高分辨率图象,这里需要特别说明一下模型是基于YCrCb色彩空间的Y通道训练生产的。所以首先需要把输入图象从RGB色彩空间转换为YCrCb色彩空间,分离Y通道作为输入,最终得到的输出图象是Y通道,需要重新merge到原来的YCrCb图象中,然后再转换为RGB图象。
下载并转换为ONNX格式的代码如下
model_url = 'https://s3.amazonaws.com/pytorch/test_data/export/superres_epoch100-44c6958e.pth'
batch_size = 1    # just a random number

# Initialize model with the pretrained weights
map_location = lambda storage, loc: storage
if torch.cuda.is_available():
    map_location = None
torch_model.load_state_dict(torch.utils.model_zoo.load_url(model_url, map_location=map_location))

# set the model to inference mode
torch_model.eval()

# Input to the model
x = torch.randn(batch_size, 1, 224, 224, requires_grad=True)
torch_out = torch_model(x)

# Export the model
torch.onnx.export(torch_model,               # model being run
                  x,                         # model input (or a tuple for multiple inputs)
                  "super_resolution.onnx",   # where to save the model (can be a file or file-like object)
                  export_params=True,        # store the trained parameter weights inside the model file
                  opset_version=10,          # the ONNX version to export the model to
                  do_constant_folding=True,  # whether to execute constant folding for optimization
                  input_names = ['input'],   # the model's input names
                  output_names = ['output'], # the model's output names
                  dynamic_axes={'input' : {0 : 'batch_size'},    # variable length axes
                                'output' : {0 : 'batch_size'}})

onnx_model = onnx.load("super_resolution.onnx")
onnx.checker.check_model(onnx_model)
img = Image.open("D:/cat_224x224.jpg")

resize = transforms.Resize([224, 224])
img = resize(img)

img_ycbcr = img.convert('YCbCr')
img_y, img_cb, img_cr = img_ycbcr.split()

to_tensor = transforms.ToTensor()
img_y = to_tensor(img_y)
img_y.unsqueeze_(0)

ort_inputs = {ort_session.get_inputs()[0].name: to_numpy(img_y)}
ort_outs = ort_session.run(None, ort_inputs)
img_out_y = ort_outs[0]

img_out_y = Image.fromarray(np.uint8((img_out_y[0] * 255.0).clip(0, 255)[0]), mode='L')
final_img = Image.merge(
    "YCbCr", [
        img_out_y,
        img_cb.resize(img_out_y.size, Image.BICUBIC),
        img_cr.resize(img_out_y.size, Image.BICUBIC),
    ]).convert("RGB")

final_img.save("D:/cat_superres_with_ort.jpg")
输入图像:

超分辨之后的图象:

扫码查看OpenCV+Pytorch系统化学习路线图

推荐阅读
CV全栈开发者说 - 从传统算法到深度学习怎么修炼
Pytorch轻松实现经典视觉任务
教程推荐 | Pytorch框架CV开发-从入门到实战
OpenCV4 C++学习 必备基础语法知识三
OpenCV4 C++学习 必备基础语法知识二
OpenCV4.5.4 人脸检测+五点landmark新功能测试
OpenCV4.5.4人脸识别详解与代码演示
OpenCV二值图象分析之Blob分析找圆
