微信公众号:OpenCV学堂
关注获取更多计算机视觉与深度学习知识
引言
Pytorch量化支持
量化配置:声明权重参数与激活函数的量化方法计算后端:支持的硬件平台量化引擎:引擎声明那个硬件平台支持,要跟量化配置中的声明保持一致
https://github.com/pytorch/FBGEMMhttps://github.com/pytorch/QNNPACK默认设置fbgemm
# set the qconfig for PTQ
qconfig = torch.quantization.get_default_qconfig('fbgemm')
# or, set the qconfig for QAT
qconfig = torch.quantization.get_default_qat_qconfig('fbgemm')
# set the qengine to control weight packing
torch.backends.quantized.engine = 'fbgemm'
默认设置qnnpack:
# set the qconfig for PTQ
qconfig = torch.quantization.get_default_qconfig('qnnpack')
# or, set the qconfig for QAT
qconfig = torch.quantization.get_default_qat_qconfig('qnnpack')
# set the qengine to control weight packing
torch.backends.quantized.engine = 'qnnpack'
Eager模式量化
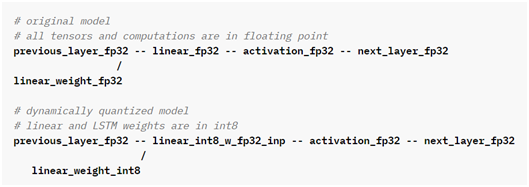
动态量化

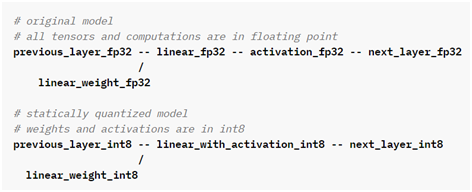
静态量化
就是大家熟知的PTO(Post Training Quantization),训练后量化方式,主要针对的是CNN网络,它量化前后对比如下:

可以看出动态量化主要针对的激活函数!
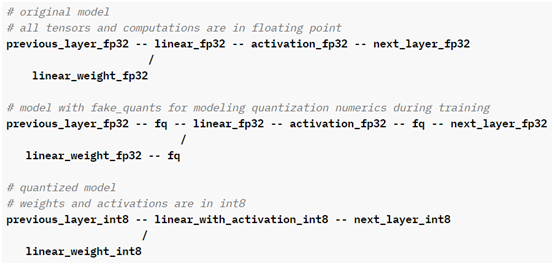
量化感知训练
量化感知训练方式得到的模型精度相比其它的方式要高,对比原来浮点数模型精度下降没有PTO方式的大。它量化前后对比如下:

API函数演示:
import torch

# define a floating point model where some layers could benefit from QAT
class M(torch.nn.Module):
    def __init__(self):
        super(M, self).__init__()
        # QuantStub converts tensors from floating point to quantized
        self.quant = torch.quantization.QuantStub()
        self.conv = torch.nn.Conv2d(1, 1, 1)
        self.bn = torch.nn.BatchNorm2d(1)
        self.relu = torch.nn.ReLU()
        # DeQuantStub converts tensors from quantized to floating point
        self.dequant = torch.quantization.DeQuantStub()

    def forward(self, x):
        x = self.quant(x)
        x = self.conv(x)
        x = self.bn(x)
        x = self.relu(x)
        x = self.dequant(x)
        return x

# create a model instance
model_fp32 = M()

# model must be set to train mode for QAT logic to work
model_fp32.train()

# attach a global qconfig, which contains information about what kind
# of observers to attach. Use 'fbgemm' for server inference and
# 'qnnpack' for mobile inference. Other quantization configurations such
# as selecting symmetric or assymetric quantization and MinMax or L2Norm
# calibration techniques can be specified here.
model_fp32.qconfig = torch.quantization.get_default_qat_qconfig('fbgemm')

# fuse the activations to preceding layers, where applicable
# this needs to be done manually depending on the model architecture
model_fp32_fused = torch.quantization.fuse_modules(model_fp32,
    [['conv', 'bn', 'relu']])

# Prepare the model for QAT. This inserts observers and fake_quants in
# the model that will observe weight and activation tensors during calibration.
model_fp32_prepared = torch.quantization.prepare_qat(model_fp32_fused)

# run the training loop (not shown)
training_loop(model_fp32_prepared)

# Convert the observed model to a quantized model. This does several things:
# quantizes the weights, computes and stores the scale and bias value to be
# used with each activation tensor, fuses modules where appropriate,
# and replaces key operators with quantized implementations.
model_fp32_prepared.eval()
model_int8 = torch.quantization.convert(model_fp32_prepared)

# run the model, relevant calculations will happen in int8
res = model_int8(input_fp32)
预告一下,下一篇完整实例!
参考:
https://pytorch.org/docs/stable/quantization.html
https://arxiv.org/pdf/1506.02025.pdf
扫码查看OpenCV+Pytorch系统化学习路线图

推荐阅读
CV全栈开发者说 - 从传统算法到深度学习怎么修炼
2021入坑Pytorch框架学习,我该从哪开始...
Pytorch轻松实现经典视觉任务
教程推荐 | Pytorch框架CV开发-从入门到实战
OpenCV4 C++学习 必备基础语法知识三
OpenCV4 C++学习 必备基础语法知识二
OpenCV4.5.4 人脸检测+五点landmark新功能测试
OpenCV4.5.4人脸识别详解与代码演示
