击上方“一口Linux”,选择“星标公众号”

粉丝留言,想知道如何使用Makefile给多个文件和多级目录建立一个工程,必须安排!
关于Makefile的入门参考文章,可以先看这篇文章:
《Makefile入门教程》
为了让大家有个更加直观的感受,一口君将之前写的一个小项目,本篇在该项目基础上进行修改。
该项目详细设计和代码,见下文:
《从0写一个《电话号码管理系统》的C入门项目【适合初学者】》
好了,开始吧!
我们将该项目的所有功能函数放到以该函数名命名的c文件,同时放到对应名称的子目录中。
比如函数allfree(),存放到 allfree/allfree.c中
最终目录结构如下图所示:
 peng@ubuntu:/mnt/hgfs/code/phone$ tree .
.
├── allfree
│   ├── allfree.c
│   └── Makefile
├── create
│   ├── create.c
│   └── Makefile
├── delete
│   ├── delete.c
│   └── Makefile
├── display
│   ├── display.c
│   └── Makefile
├── include
│   ├── Makefile
│   └── phone.h
├── init
│   ├── init.c
│   └── Makefile
├── login
│   ├── login.c
│   └── Makefile
├── main
│   ├── main.c
│   └── Makefile
├── Makefile
├── menu
│   ├── Makefile
│   └── menu.c
├── scripts
│   └── Makefile
└── search
    ├── Makefile
    └── search.c

11 directories, 22 files
直接看下编译结果吧:
peng@ubuntu:/mnt/hgfs/code/phone$ make
make[1]: Entering directory '/mnt/hgfs/code/phone/allfree'
make[1]: Nothing to be done for 'all'.
make[1]: Leaving directory '/mnt/hgfs/code/phone/allfree'
make[1]: Entering directory '/mnt/hgfs/code/phone/create'
make[1]: Nothing to be done for 'all'.
make[1]: Leaving directory '/mnt/hgfs/code/phone/create'
make[1]: Entering directory '/mnt/hgfs/code/phone/delete'
make[1]: Nothing to be done for 'all'.
make[1]: Leaving directory '/mnt/hgfs/code/phone/delete'
make[1]: Entering directory '/mnt/hgfs/code/phone/display'
make[1]: Nothing to be done for 'all'.
make[1]: Leaving directory '/mnt/hgfs/code/phone/display'
make[1]: Entering directory '/mnt/hgfs/code/phone/init'
make[1]: Nothing to be done for 'all'.
make[1]: Leaving directory '/mnt/hgfs/code/phone/init'
make[1]: Entering directory '/mnt/hgfs/code/phone/login'
make[1]: Nothing to be done for 'all'.
make[1]: Leaving directory '/mnt/hgfs/code/phone/login'
make[1]: Entering directory '/mnt/hgfs/code/phone/menu'
make[1]: Nothing to be done for 'all'.
make[1]: Leaving directory '/mnt/hgfs/code/phone/menu'
make[1]: Entering directory '/mnt/hgfs/code/phone/search'
make[1]: Nothing to be done for 'all'.
make[1]: Leaving directory '/mnt/hgfs/code/phone/search'
make[1]: Entering directory '/mnt/hgfs/code/phone/main'
make[1]: Nothing to be done for 'all'.
make[1]: Leaving directory '/mnt/hgfs/code/phone/main'
gcc -Wall -O3 -o phone allfree/*.o create/*.o delete/*.o display/*.o init/*.o login/*.o menu/*.o search/*.o main/*.o -lpthread
phone make done!
运行结果如下:
'@' '$' '$$' '-' '-n '的说明'@'@echo --compiling module----; // 屏幕输出 --compiling module----
echo --compiling module----; // 没有@ 屏幕输出echo --compiling module----
' - '通常删除,创建文件如果碰到文件不存在或者已经创建,那么希望忽略掉这个错误,继续执行,就可以在命令前面添加 -,
-rm dir;
-mkdir aaadir;
' $ '美元符号$,主要扩展打开makefile中定义的变量
' $$ '$$ 符号主要扩展打开makefile中定义的shell变量
说明: 列出当前目录下所有符合模式“ PATTERN”格式的文件名,并且以空格分开。“ PATTERN”使用shell可识别的通配符,包括“ ?”(单字符)、“ *”(多字符)等。示例:
$(wildcard *.c)
返回值为当前目录下所有.c 源文件列表。
说明:把字串“ x.c.c bar.c”中以.c 结尾的单词替换成以.o 结尾的字符。示例:
$(patsubst %.c,%.o,x.c.c bar.c)
函数的返回结果 是
x.c.o bar.o
说明:去除文件名中的路径信息 示例:
SRC = ( notdir ./src/a.c )
去除文件a . c 的路径信息 , 使用 (notdir ./src/a.c) 去除文件a.c的路径信息,使用 (notdir./src/a.c)去除文件a.c的路径信息,使用(SRC)得到的是不带路径的文件名称,即a.c。
使用-I+头文件路径的方式可以指定编译器的头文件的路径 示例:
INCLUDES = -I./inc
$(CC) -c $(INCLUDES) $(SRC)
函数名称:加后缀函数—addsuffix。语法:
$(addsuffix SUFFIX,NAMES…)
函数功能:为“NAMES…”中的每一个文件名添加后缀“SUFFIX”。参数“NAMES…” 为空格分割的文件名序列,将“SUFFIX”追加到此序列的每一个文件名 的末尾。返回值:以单空格分割的添加了后缀“SUFFIX”的文件名序列。函数说明:示例:
$(addsuffix .c,foo bar)
返回值为
foo.c bar.c
在Makefile使用include关键字可以把别的Makefile包含进来,这很像C语言的#include,被包含的文件会原模原样的放在当前文件的包含位置。比如命令
include file.dep
即把file.dep文件在当前Makefile文件中展开,亦即把file.dep文件的内容包含进当前Makefile文件
在 include前面可以有一些空字符,但是绝不能是[Tab]键开始。
foreach函数和别的函数非常的不一样。因为这个函数是用来做循环用的 语法是:
$(foreach <var>,<list>,<text> )
这个函数的意思是,把参数中的单词逐一取出放到参数所指定的变量中,然后再执行
每一次
所以,最好是一个变量名,可以是一个表达式,而
中的单词。
举例:
names := a b c d
files := $(foreach n,$(names),$(n).o)
上面的例子中,$(name)中的单词会被挨个取出,并存到变量“n”中,“$(n).o”每次根据“$(n)”计算出一个值,这些值以空格分隔,最后作为foreach函数的返回,所以,$(files)的值是“a.o b.o c.o d.o”。
注意,foreach中的参数是一个临时的局部变量,foreach函数执行完后,参数的变量将不在作用,其作用域只在foreach函数当中。
“ call”函数是唯一一个可以创建定制化参数函数的引用函数。使用这个函数可以实现对用户自己定义函数引用。我们可以将一个变量定义为一个复杂的表达式,用“ call”函数根据不同的参数对它进行展开来获得不同的结果。
函数语法:
$(call variable,param1,param2,...)
函数功能:在执行时,将它的参数“ param”依次赋值给临时变量“ $(1)”、“ $(2)” call 函数对参数的数目没有限制,也可以没有参数值,没有参数值的“ call”没有任何实际存在的意义。执行时变量“ variable”被展开为在函数上下文有效的临时变量,变量定义中的“ $(1)”作为第一个参数,并将函数参数值中的第一个参数赋值给它;变量中的“ $(2)”一样被赋值为函数的第二个参数值;依此类推(变量**$(0)**代表变量“ variable”本身)。之后对变量“ variable” 表达式的计算值。
返回值:参数值“ param”依次替换“ $(1)”、“ $(2)”…… 之后变量“ variable”定义的表达式的计算值。
函数说明:
$”(当然,除非此变量名是一个计算的变量名)。函数示例:
reverse = $(2)$(1)
foo = $(call reverse,a,b)
all:
 @echo "foo=$(foo)"
执行结果:
foo=ba
即a替代了(2)

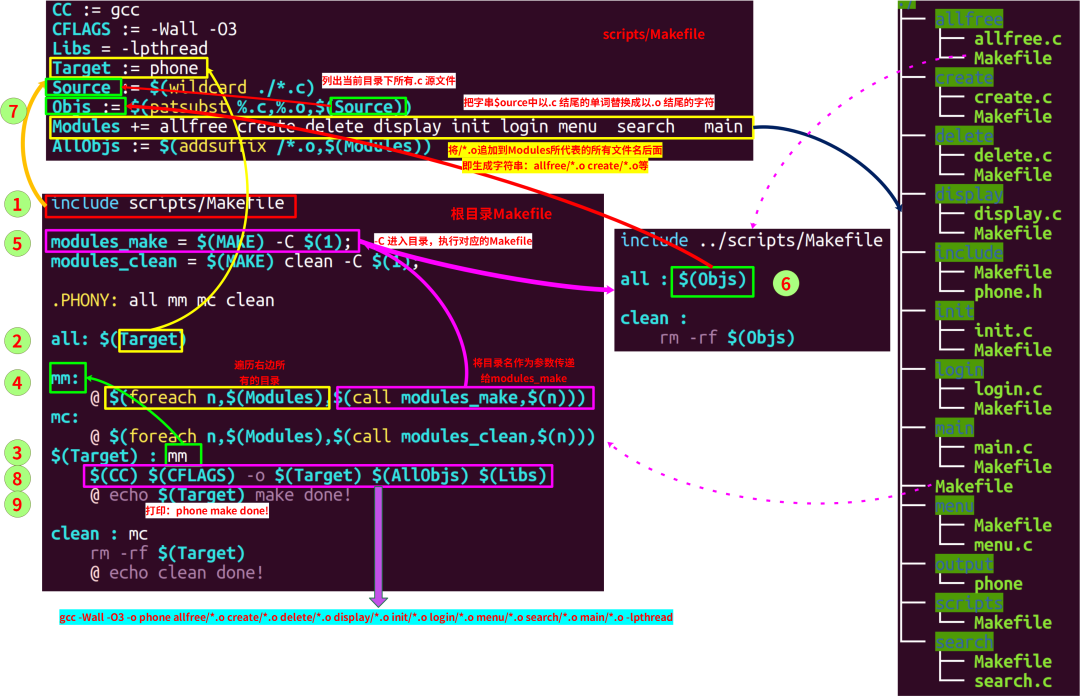
我们在根目录下执行make命令后,详细步骤如下:
$(Target)$(Target) 在scripts/Makefile中定义了,即phone$(Target)依赖于mm@ $(foreach n,$(Modules),$(call modules_make,$(n)))
Modules是所有的目录名字集合, foreach 会遍历字符串$(Modules)中每个词语, 每个词语会赋值给n, 同时执行语句:
call modules_make,$(n)
$(MAKE) -C $(1)所替代,$(MAKE) 有默认的名字make
-C:进入子目录执行make$(1) :是步骤4中$(n),即每一个目录名字
最终步骤4的语句就是进入到每一个目录下,执行每一个目录下的Makefile
Objs := $(patsubst %.c,%.o,$(Source))
patsubst 把字串$ource中以.c 结尾的单词替换成以.o 结尾的字符
而
Source := $(wildcard ./*.c)
wildcard 会列举出当前目录下所有的.c文件
所以第6步最终就是将子目录下的所有的.c文件,编译生成对应文件名的.o文件
$(CC) $(CFLAGS) -o $(Target) $(AllObjs) $(Libs)
这几个变量都在文件scripts/Makefile中定义$(CC) :替换成gcc,制定编译器$(CFLAGS) :替换成-Wall -O3,即编译时的优化等级-o $(Target):生成可执行程序phone$(AllObjs) :
AllObjs := $(addsuffix /*.o,$(Modules))
addsuffix 会将 /*.o追加到$(Modules)中所有的词语后面,也就是我们之前在子目录下编译生成的所有的.o文件$(Libs) :替换为-lpthread,即所需要的动态库
大家可以根据这个步骤,来分析一下执行make clean时,执行步骤
完整的实例程序公众号后台回复:电话号码管理
《电话号码管理-makefile版.rar》
end
一口Linux
关注,回复【1024】海量Linux资料赠送
精彩文章合集
linux入门
嵌入式驱动工程师学习路线
Linux嵌入式所有知识点-思维导图
点击“阅读原文”查看更多分享,欢迎点分享、收藏、点赞、在看