https://github.com/EminentCodfish/GoPro-Calibration-Distortion-RemovalGoPro 使用的鱼眼镜头提供了广阔的视野,但它也会扭曲图像。在这个项目中,我们将通过使用 Python 和 OpenCV 校准相机来消除失真。
https://www.theeminentcodfish.com/gopro-calibration/除了高端型号外,每台相机都会在图像上产生某种形式的失真。下边的图像是从 GoPro Hero 3 上拍摄的。正如你所看到的,图像中应该是直线的物体(红线),比如门框和橱柜,都是弯曲的。这主要是由于镜头的形状造成的,通常称为径向畸变。当你远离图像中心时,GoPro 相机中使用的鱼眼镜头会导致失真增加。有第二种失真形式称为平移失真,它源于这样一个事实,即镜头通常不会完美地居中并平行于成像传感器。
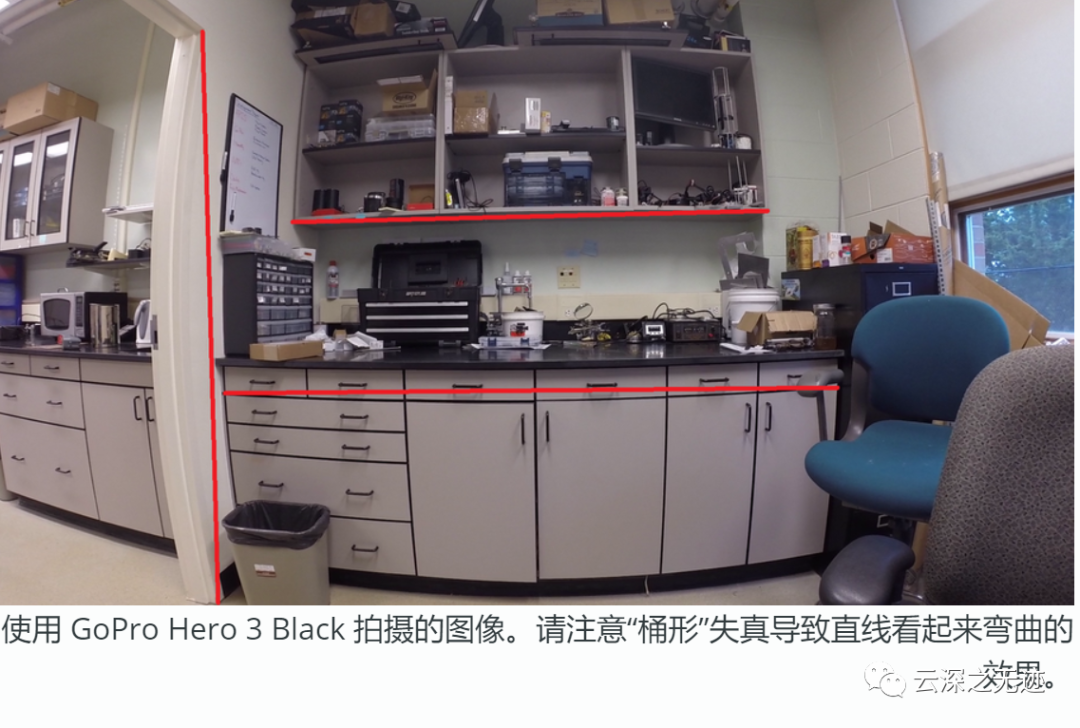
此脚本已在 GoPro Hero 2 和 GoPro Hero 3 black 上进行了测试。
现在是Py3.0多,其实代码不难,可以很方便的去移植
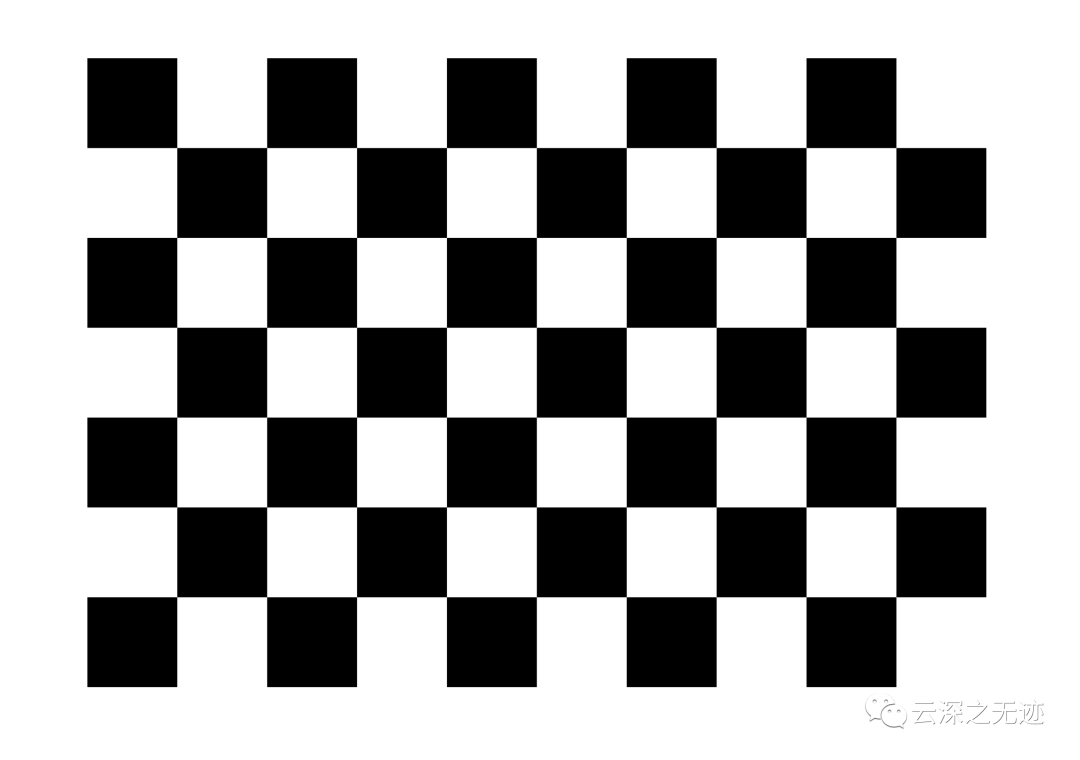
你需要打印这个图案来进行校准
校准相机系统依赖于收集已知尺寸的校准图案的图像。此脚本将收集此图案的图像并将图像中图案的尺寸与现实生活中的尺寸进行比较。这将使我们能够对整个视场中的图像失真进行建模并计算相机的失真参数。然后我们将根据这些值对图像或视频进行失真处理。

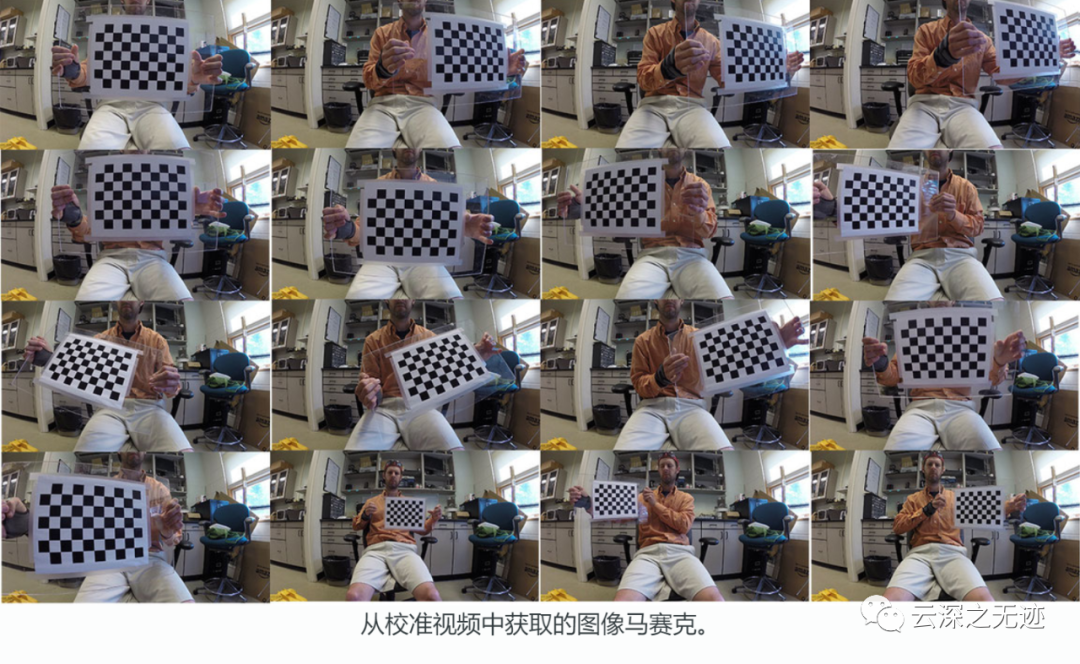
对于这个脚本,我们将使用可以在上面下载的棋盘模式。我通常在一张标准的 8.5" x 11" 纸上打印出这个图案,然后把它贴在一块有机玻璃上。任何刚性都可以,我们只是不希望校准图案变形。接下来,我们需要创建校准模式的视频。该脚本将播放此视频,您将能够保存用于校准的图案图像。使用 GoPro,如果没有两个人和 LCD 背包,这可能会有点困难,因为您看不到正在拍摄的内容。但是,我通常只用我自己来做。要录制视频,请确保相机位于稳定的平台上,使其保持静止。在录制时,将校准图案至少距离相机约 2 英尺,并在视野周围移动图案。由于我通常看不到视频,我慢慢地左右移动图案,上下移动以将其定位在许多不同的位置。缓慢移动图案,任何运动模糊都会降低校准的准确性。您希望能够在摄像机视场周围的许多不同位置拉取具有该图案的视频帧。确保将图案放置在至少 20 个独特的位置,尝试获取外围,因为这是扭曲最明显的地方。随意前后移动图案,图案的旋转不是问题。下图显示了用于校准的马赛克图像。由于我通常看不到视频,我慢慢地左右移动图案,上下移动以将其定位在许多不同的位置。缓慢移动图案,任何运动模糊都会降低校准的准确性。您希望能够在摄像机视场周围的许多不同位置拉取具有该图案的视频帧。确保将图案放置在至少 20 个独特的位置,尝试获取外围,因为这是扭曲最明显的地方。随意前后移动图案,图案的旋转不是问题。下图显示了用于校准的马赛克图像。由于我通常看不到视频,我慢慢地左右移动图案,上下移动以将其定位在许多不同的位置。缓慢移动图案,任何运动模糊都会降低校准的准确性。您希望能够在摄像机视场周围的许多不同位置拉取具有该图案的视频帧。确保将图案放置在至少 20 个独特的位置,尝试获取外围,因为这是扭曲最明显的地方。随意前后移动图案,图案的旋转不是问题。下图显示了用于校准的马赛克图像。任何运动模糊都会降低校准的准确性。您希望能够在摄像机视场周围的许多不同位置拉取具有该图案的视频帧。确保将图案放置在至少 20 个独特的位置,尝试获取外围,因为这是扭曲最明显的地方。随意前后移动图案,图案的旋转不是问题。下图显示了用于校准的马赛克图像。任何运动模糊都会降低校准的准确性。您希望能够在摄像机视场周围的许多不同位置拉取具有该图案的视频帧。确保将图案放置在至少 20 个独特的位置,尝试获取外围,因为这是扭曲最明显的地方。随意前后移动图案,图案的旋转不是问题。下图显示了用于校准的马赛克图像。图案的旋转不是问题。下图显示了用于校准的马赛克图像。图案的旋转不是问题。下图显示了用于校准的马赛克图像。
在本节中,我们将开始校准。首先打开脚本并检查校准参数部分

在这里,您需要将脚本定向到名为“filename”的校准视频文件。如果文件与脚本在同一个文件夹中,那么名称就足够了,如果不是,则需要添加文件目录(即“C:\Video\GoProVideo.MP4”)。接下来检查其余参数并根据需要进行更改。通常我使用 20 个校准图像。如果您使用提供的棋盘格,则应设置 board_w 和 board_h。检查棋盘格的尺寸并调整 board_dim 值。如果您以不同的分辨率录制,最后更改 image_size。如果您更改相机的分辨率或 FOV 设置,则会更改失真模型,应重新校准。
设置好脚本后,运行程序。视频将开始播放。按空格键保存视频帧以进行校准。视频将一直运行,直到视频结束或收集到上面列出的校准图像的数量为止。您可以通过按 esc 按钮中止程序。
import cv2, sysimport numpy as np#Import Informationfilename = 'GOPR005.MP4'#Input the number of board images to use for calibration (recommended: ~20)n_boards = 20#Input the number of squares on the board (width and height)board_w = 9board_h = 6#Board dimensions (typically in cm)board_dim = 25#Image resolutionimage_size = (1920, 1080)#The ImageCollect function requires two input parameters. Filename is the name of the file#in which checkerboard images will be collected from. n_boards is the number of images of#the checkerboard which are needed. In the current writing of this function an additional 5#images will be taken. This ensures that the processing step has the correct number of images#and can skip an image if the program has problems.#This function loads the video file into a data space called video. It then collects various#meta-data about the file for later inputs. The function then enters a loop in which it loops#through each image, displays the image and waits for a fixed amount of time before displaying#the next image. The playback speed can be adjusted in the waitKey command. During the loop#checkerboard images can be collected by pressing the spacebar. Each image will be saved as a#*.png into the directory which stores this file. The ESC key will terminate the function.#The function will end once the correct number of images are collected or the video ends.#For the processing step, try to collect all the images before the video ends.def ImageCollect(filename, n_boards):#Collect Calibration Imagesprint('-----------------------------------------------------------------')print('Loading video...')#Load the file given to the functionvideo = cv2.VideoCapture(filename)#Checks to see if a the video was properly importedstatus = video.isOpened()if status == True:#Collect metadata about the file.FPS = video.get(cv2.cv.CV_CAP_PROP_FPS)FrameDuration = 1/(FPS/1000)width = video.get(cv2.cv.CV_CAP_PROP_FRAME_WIDTH)height = video.get(cv2.cv.CV_CAP_PROP_FRAME_HEIGHT)size = (int(width), int(height))total_frames = video.get(cv2.cv.CV_CAP_PROP_FRAME_COUNT)#Initializes the frame counter and collected_image countercurrent_frame = 0collected_images = 0#Video loop. Press spacebar to collect images. ESC terminates the function.while current_frame < total_frames:success, image = video.read()current_frame = video.get(cv2.cv.CV_CAP_PROP_POS_FRAMES)cv2.imshow('Video', image)k = cv2.waitKey(int(FrameDuration)) #You can change the playback speed hereif collected_images == n_boards:breakif k == 32:collected_images += 1cv2.imwrite('Calibration_Image' + str(collected_images) + '.png', image)print(str(collected_images) + ' images collected.')if k == 27:break#Clean upvideo.release()cv2.destroyAllWindows()else:print('Error: Could not load video')sys.exit()#The ImageProcessing function performs the calibration of the camera based on the images#collected during ImageCollect function. This function will look for the images in the folder#which contains this file. The function inputs are the number of boards which will be used for#calibration (n_boards), the number of squares on the checkerboard (board_w, board_h) as#determined by the inside points (i.e. where the black squares touch). board_dim is the actual#size of the square, this should be an integer. It is assumed that the checkerboard squares are#square.#This function first initializes a series of variables. Opts will store the true object points#(i.e. checkerboard points). Ipts will store the points as determined by the calibration images.#The function then loops through each image. Each image is converted to grayscale, and the#checkerboard corners are located. If it is successful at finding the correct number of corners#then the true points and the measured points are stored into opts and ipts, respectively. The#image with the checkerboard points are then displays. If the points are not found that image#is skipped. Once the desired number of checkerboard points are acquired the calibration#parameters (intrinsic matrix and distortion coefficients) are calculated.#The distortion parameter are saved into a numpy file (calibration_data.npz). The total#total reprojection error is calculated by comparing the "true" checkerboard points to the#image measured points once the image is undistorted. The total reprojection error should be#close to zero.#Finally the function will go through the calbration images and display the undistorted image.def ImageProcessing(n_boards, board_w, board_h, board_dim):#Initializing variablesboard_n = board_w * board_hopts = []ipts = []npts = np.zeros((n_boards, 1), np.int32)intrinsic_matrix = np.zeros((3, 3), np.float32)distCoeffs = np.zeros((5, 1), np.float32)criteria = (cv2.TERM_CRITERIA_EPS + cv2.TERM_CRITERIA_MAX_ITER, 30, 0.1)# prepare object points based on the actual dimensions of the calibration board# like (0,0,0), (25,0,0), (50,0,0) ....,(200,125,0)objp = np.zeros((board_h*board_w,3), np.float32)objp[:,:2] = np.mgrid[0:(board_w*board_dim):board_dim,0:(board_h*board_dim):board_dim].T.reshape(-1,2)#Loop through the images. Find checkerboard corners and save the data to ipts.for i in range(1, n_boards + 1):#Loading imagesprint 'Loading... Calibration_Image' + str(i) + '.png'image = cv2.imread('Calibration_Image' + str(i) + '.png')#Converting to grayscalegrey_image = cv2.cvtColor(image, cv2.COLOR_RGB2GRAY)#Find chessboard cornersfound, corners = cv2.findChessboardCorners(grey_image, (board_w,board_h),cv2.cv.CV_CALIB_CB_ADAPTIVE_THRESH + cv2.cv.CV_CALIB_CB_NORMALIZE_IMAGE)print (found)if found == True:#Add the "true" checkerboard cornersopts.append(objp)#Improve the accuracy of the checkerboard corners found in the image and save them to the ipts variable.cv2.cornerSubPix(grey_image, corners, (20, 20), (-1, -1), criteria)ipts.append(corners)#Draw chessboard cornerscv2.drawChessboardCorners(image, (board_w, board_h), corners, found)#Show the image with the chessboard corners overlaid.cv2.imshow("Corners", image)char = cv2.waitKey(0)cv2.destroyWindow("Corners")print ''print 'Finished processes images.'#Calibrate the cameraprint 'Running Calibrations...'print(' ')ret, intrinsic_matrix, distCoeff, rvecs, tvecs = cv2.calibrateCamera(opts, ipts, grey_image.shape[::-1],None,None)#Save matricesprint('Intrinsic Matrix: ')print(str(intrinsic_matrix))print(' ')print('Distortion Coefficients: ')print(str(distCoeff))print(' ')#Save dataprint 'Saving data file...'np.savez('calibration_data', distCoeff=distCoeff, intrinsic_matrix=intrinsic_matrix)print 'Calibration complete'#Calculate the total reprojection error. The closer to zero the better.tot_error = 0for i in xrange(len(opts)):imgpoints2, _ = cv2.projectPoints(opts[i], rvecs[i], tvecs[i], intrinsic_matrix, distCoeff)error = cv2.norm(ipts[i],imgpoints2, cv2.NORM_L2)/len(imgpoints2)tot_error += errorprint "total reprojection error: ", tot_error/len(opts)#Undistort Imagesfor i in range(1, n_boards + 1):#Loading imagesprint 'Loading... Calibration_Image' + str(i) + '.png'image = cv2.imread('Calibration_Image' + str(i) + '.png')# undistortdst = cv2.undistort(image, intrinsic_matrix, distCoeff, None)cv2.imshow('Undisorted Image',dst)char = cv2.waitKey(0)cv2.destroyAllWindows()print("Starting camera calibration....")print("Step 1: Image Collection")print("We will playback the calibration video. Press the spacebar to save")print("calibration images.")print(" ")print('We will collect ' + str(n_boards) + ' calibration images.')#ImageCollect(filename, n_boards)print(' ')print('All the calibration images are collected.')print('------------------------------------------------------------------------')print('Step 2: Calibration')print('We will analyze the images take and calibrate the camera.')print('Press the esc button to close the image windows as they appear.')print(' ')ImageProcessing(n_boards, board_w, board_h, board_dim)
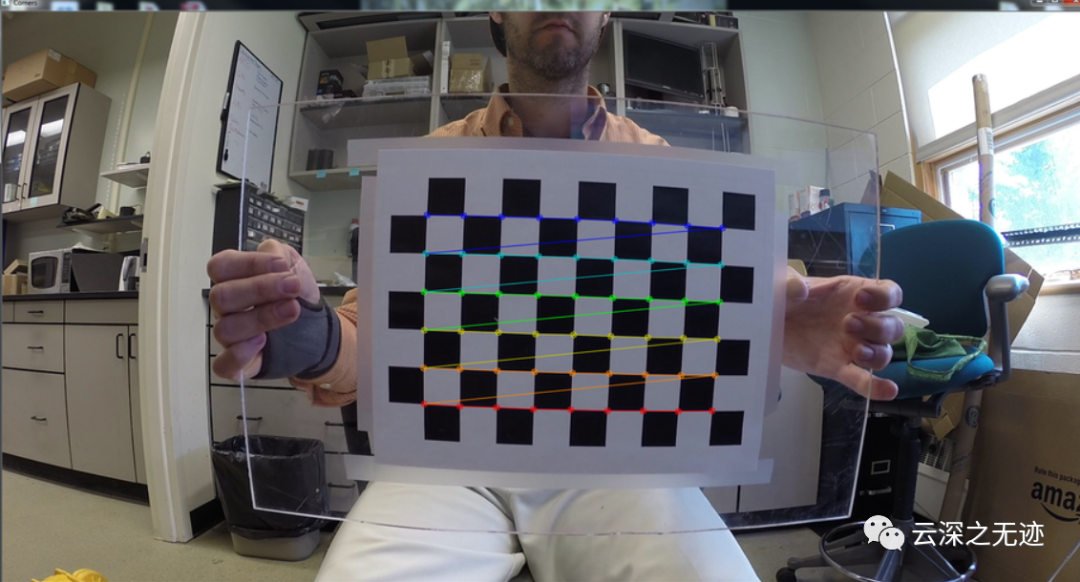
上一步完成后,脚本将加载校准图像并尝试定位棋盘角。如果找到角,程序将返回 True 并显示与右侧相似的图像。检查图像以确保可以很好地识别角落。在进行校准过程时,多次尝试以了解最有效的方法有时很有用。你做的越多,你就越了解程序喜欢哪些图像以及哪些图像质量较差或被拒绝。
图像被选中后,按 esc 按钮移动到下一个图像。分析完所有图像后,脚本将运行校准功能。下面是输出示例。
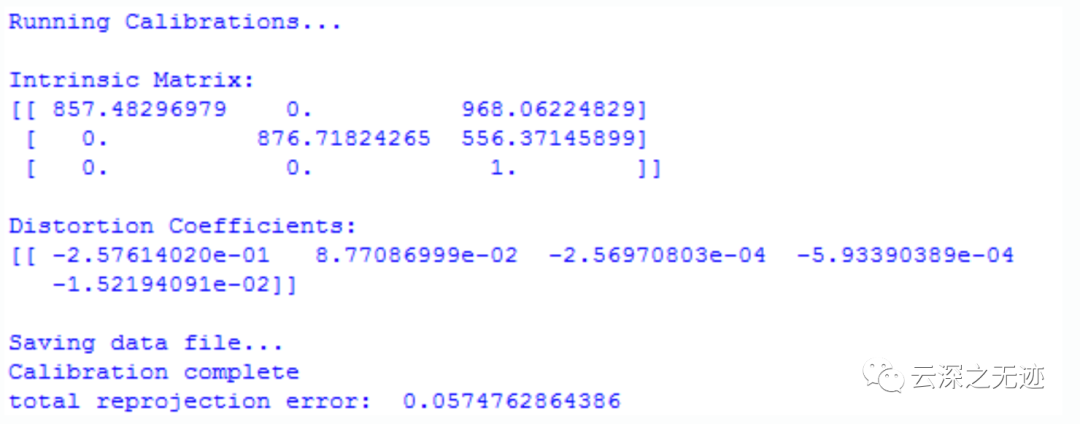
对于相机校准,有两个重要的数据集,内在矩阵和失真系数。3x3 矩阵中的固有矩阵,其中包含有关焦距(矩阵中的位置 0,0 和 1,1)和主点(位置 2,0 和 2,1)的信息。主点是图像上位于镜头中心正下方的点。理想情况下,该值应位于图像的中心,但通常略微偏离中心。检查值以确保数字不会偏离。这些值应该大约是水平和垂直分辨率的一半。您将看到的下一个数据是失真系数。这些值是将进入失真模型的参数。这两个数据集都保存到一个 *.npz numpy 文件中,

是个二进制的文件
最后,程序将计算总重投影误差。该值越接近零越好。我通常喜欢 0.1 以下的值。尝试校准,看看什么有效,什么改进了它。
校准结果后,脚本将重新加载校准图像并消除失真。按 esc 按钮在图像之间移动。这是确保校准模型准确的另一个验证步骤。如果图像看起来不正确,则校准模型可能不准确,应重新校准相机。
由于 GoPro 中的鱼眼失真,外围的像素比应有的更分散。不失真方法获取这些像素并将它们移近图像的中心。缺少像素往往会出现在角落周围,因为失真非常严重,并且没有视频帧外的信息来填充这些区域。OpenCV 中的标准方法是裁剪图像,因此不会丢失像素。您会注意到边缘周围的信息丢失。在新的 OpenCV 3 版本中,脚本顶部有一个裁剪参数(第 29 行)。如果此值设置为 0,则程序将裁剪掉所有黑色像素。这将导致外围的一些信息丢失。值为 1 将利用所有可用像素。这将导致原始图像中没有信息的黑色区域,但如果在边缘和角落附近有重要信息,这将很有用。我发现这个值需要调整到中间的 ~0.5 以针对每种情况进行优化。
校准相机后,可以使用以下脚本来消除使用该相机收集的任何视频的失真。请记住,如果您更改分辨率、FOV 或环境(即水下),则会影响校准。
文章是搬运,出处在开头,大家玩的愉快,当然可以适用于别的镜头~
import numpy as npimport cv2, time, sysfilename = 'GOPR0042.MP4'crop = 0.5print 'Loading data files'npz_calib_file = np.load('calibration_data.npz')distCoeff = npz_calib_file['distCoeff']intrinsic_matrix = npz_calib_file['intrinsic_matrix']npz_calib_file.close()print('Finished loading files')print(' ')print('Starting to undistort the video....')#Opens the video import and sets parametersvideo = cv2.VideoCapture(filename)#Checks to see if a the video was properly importedstatus = video.isOpened()if status == True:FPS = video.get(cv2.CAP_PROP_FPS)width = video.get(cv2.CAP_PROP_FRAME_WIDTH)height = video.get(cv2.CAP_PROP_FRAME_HEIGHT)size = (int(width), int(height))total_frames = video.get(cv2.CAP_PROP_FRAME_COUNT)frame_lapse = (1/FPS)*1000#Initializes the export video filecodec = cv2.VideoWriter_fourcc(*'DIVX')video_out = cv2.VideoWriter(str(filename[:-4])+'_undistored.avi', codec, FPS, size, 1)#Initializes the frame countercurrent_frame = 0start = time.clock()newMat, ROI = cv2.getOptimalNewCameraMatrix(intrinsic_matrix, distCoeff, size, alpha = crop, centerPrincipalPoint = 1)mapx, mapy = cv2.initUndistortRectifyMap(intrinsic_matrix, distCoeff, None, newMat, size, m1type = cv2.CV_32FC1)while current_frame < total_frames:success, image = video.read()current_frame = video.get(cv2.CAP_PROP_POS_FRAMES)dst = cv2.remap(image, mapx, mapy, cv2.INTER_LINEAR)#dst = cv2.undistort(image, intrinsic_matrix, distCoeff, None)video_out.write(dst)video.release()video_out.release()duration = (time.clock()-float(start))/60print(' ')print('Finished undistorting the video')print('This video took:' + str(duration) + ' minutes')else:print("Error: Video failed to load")sys.exit()