
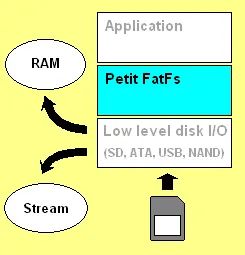
所以,在选用Petit FAT文件系统之后,MM32G0001对文件系统的实现成为了可能!谁也阻挡不了客户极具性价比的心,MM32G0001满足了客户的心愿。
接下来,我们就需要在MM32G0001上来验证Petit FAT读写TF卡功能了。
四、环境准备
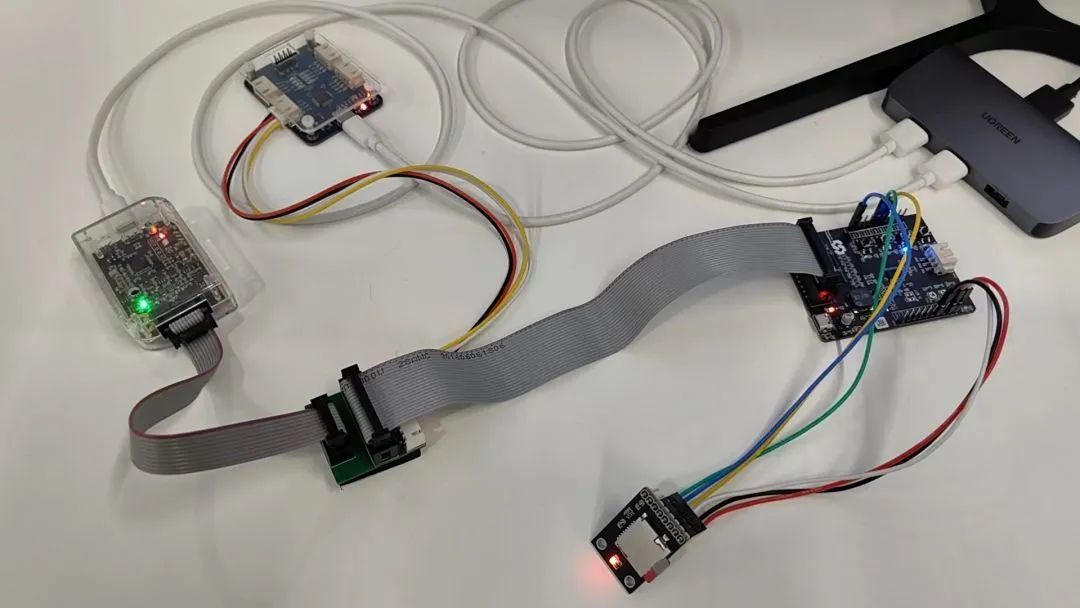
因为前期功能验证,客户硬件还没有打板,所以我们需要使用MM32官方的开发板,只有前期验证充分,后面项目在落地的时候就会更顺些。
MM32官网下载MM32G0001库函数与例程(V2版本):上海灵动微电子股份有限公司(mindmotion.com.cn)

uint8_t SD_CalcCRC7(uint64_t Bits, uint8_t BitCount){uint8_t i = 0, CRC7 = 0, XORB = 0;for (i = 1; i <= BitCount; i++){XORB = ((CRC7 >> 6) & 1) ^ ((Bits >> (BitCount - i)) & 1);CRC7 = (CRC7 << 1) & 0x7F;CRC7^= (XORB << 3) | XORB;}return (CRC7);}uint8_t SD_SendCommand(uint8_t Command, uint32_t Argument){uint8_t CRC7 = 0, Response = 0;uint64_t Bits = 0;Bits = 0x40 + Command;Bits <<= 32;Bits |= Argument;CRC7 = SD_CalcCRC7(Bits, 40) << 1;SD_SPI_NSS_H();SD_SPI_ReadWriteByte(0xFF);SD_SPI_NSS_L();SD_SPI_ReadWriteByte(0x40 + Command);SD_SPI_ReadWriteByte(Argument >> 24);SD_SPI_ReadWriteByte(Argument >> 16);SD_SPI_ReadWriteByte(Argument >> 8);SD_SPI_ReadWriteByte(Argument >> 0);SD_SPI_ReadWriteByte(CRC7 + 1);do{Response = SD_SPI_ReadWriteByte(0xFF);} while(Response & 0x80);return (Response);}
5.2 SPI模式下支持的命令
这一小节可以参考《Physical Layer Simplified Specification Version 9.10》手册的7.3.1.3章节,这里就不再展开了。
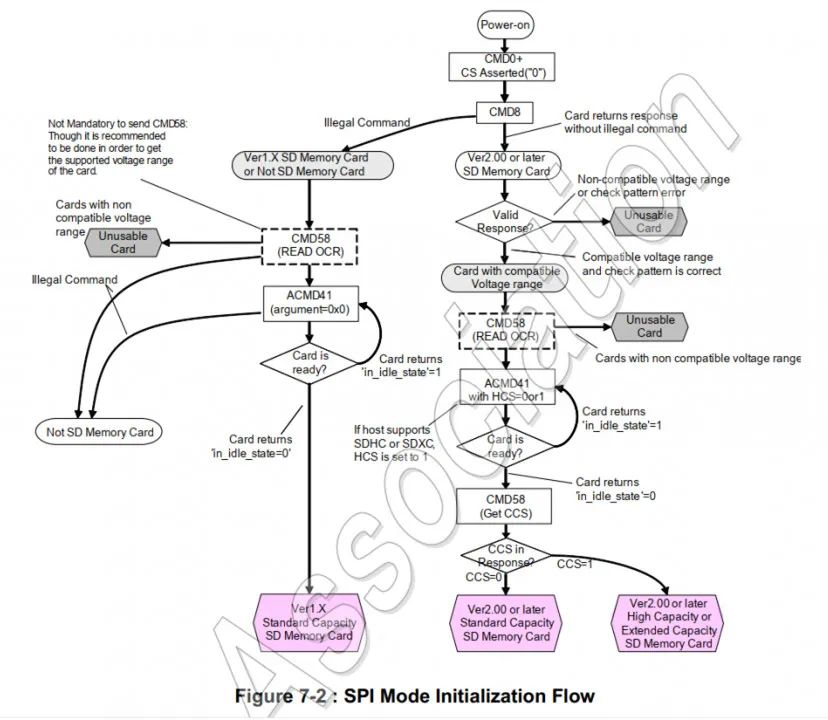
5.3 SPI模式下的初始化流程
这部分可以参考《Physical Layer Simplified Specification Version 9.10》手册的7.2.1章节。
代码实现:
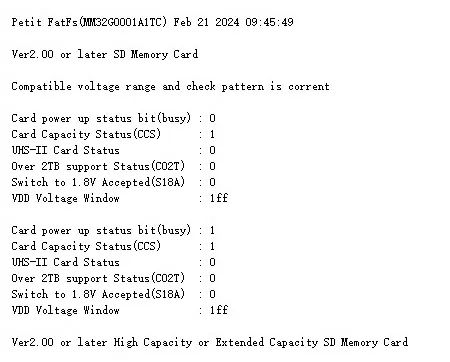
uint8_t SD_Init(void){uint8_t R7[5], OCR[4];SD_SPI_NSS_H();for(uint8_t i = 0; i < 16; i++){SD_SPI_ReadWriteByte(0xFF);}if (SD_SendCommand(CMD0, 0x00000000) != R1_IN_IDLE_STATE){printf("\r\n");printf("\r\nUnusable Card!"); return (2);}if (SD_SendCommand(CMD8, 0x000001AA) & R1_ILLEGAL_COMMAND){printf("\r\n");printf("\r\nVer1.X SD Memory Card or Not SD Memory Card");//to do...}else{printf("\r\n");printf("\r\nVer2.00 or later SD Memory Card");R7[1] = SD_SPI_ReadWriteByte(0xFF);R7[2] = SD_SPI_ReadWriteByte(0xFF);R7[3] = SD_SPI_ReadWriteByte(0xFF);R7[4] = SD_SPI_ReadWriteByte(0xFF);if ((R7[3] == 0x01) && (R7[4] == 0xAA)){printf("\r\n");printf("\r\nCompatible voltage range and check pattern is corrent");SD_SendCommand(CMD58, 0x00000000);OCR[0] = SD_SPI_ReadWriteByte(0xFF);OCR[1] = SD_SPI_ReadWriteByte(0xFF);OCR[2] = SD_SPI_ReadWriteByte(0xFF);OCR[3] = SD_SPI_ReadWriteByte(0xFF);printf("\r\n");printf("\r\nCard power up status bit(busy) : %d", SD_GetField(OCR, sizeof(OCR), 1, 31));printf("\r\nCard Capacity Status(CCS) : %d", SD_GetField(OCR, sizeof(OCR), 1, 30));printf("\r\nUHS-II Card Status : %d", SD_GetField(OCR, sizeof(OCR), 1, 29));printf("\r\nOver 2TB support Status(CO2T) : %d", SD_GetField(OCR, sizeof(OCR), 1, 27));printf("\r\nSwitch to 1.8V Accepted(S18A) : %d", SD_GetField(OCR, sizeof(OCR), 1, 24));printf("\r\nVDD Voltage Window : %x", SD_GetField(OCR, sizeof(OCR), 9, 15));JMP_ACMD41:if (SD_SendCommand(CMD55, 0x00000000) == R1_IN_IDLE_STATE){if (SD_SendCommand(ACMD41, 1UL << 30) == R1_IN_IDLE_STATE){goto JMP_ACMD41;}else{SD_SendCommand(CMD58, 0x00000000);OCR[0] = SD_SPI_ReadWriteByte(0xFF);OCR[1] = SD_SPI_ReadWriteByte(0xFF);OCR[2] = SD_SPI_ReadWriteByte(0xFF);OCR[3] = SD_SPI_ReadWriteByte(0xFF);printf("\r\n");printf("\r\nCard power up status bit(busy) : %d", SD_GetField(OCR, sizeof(OCR), 1, 31));printf("\r\nCard Capacity Status(CCS) : %d", SD_GetField(OCR, sizeof(OCR), 1, 30));printf("\r\nUHS-II Card Status : %d", SD_GetField(OCR, sizeof(OCR), 1, 29));printf("\r\nOver 2TB support Status(CO2T) : %d", SD_GetField(OCR, sizeof(OCR), 1, 27));printf("\r\nSwitch to 1.8V Accepted(S18A) : %d", SD_GetField(OCR, sizeof(OCR), 1, 24));printf("\r\nVDD Voltage Window : %x", SD_GetField(OCR, sizeof(OCR), 9, 15));if (SD_GetField(OCR, sizeof(OCR), 1, 30) != 0){printf("\r\n");printf("\r\nVer2.00 or later High Capacity or Extended Capacity SD Memory Card");}else{printf("\r\n");printf("\r\nVer2.00 or later Standard Capacity SD Memory Card");}}}else{goto JMP_ACMD41;}}else{printf("\r\n");printf("\r\nUnusable Card!"); return (1);}}SDGetCID();SDGetCSD();return (0);}
运行结果:
5.4 获取SD卡CID信息
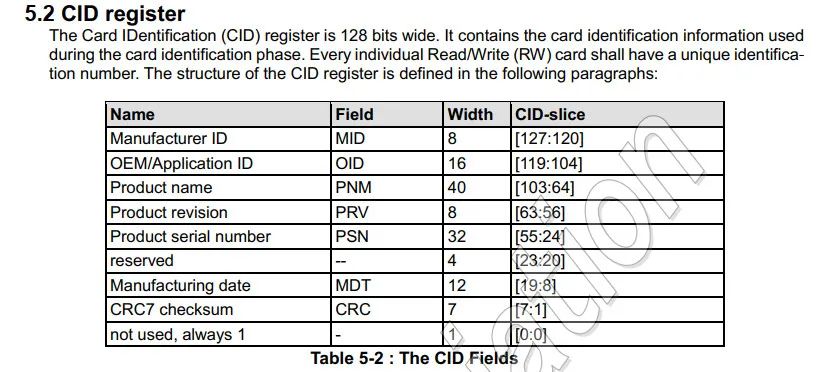
这里可以参考《Physical Layer Simplified Specification Version 9.10》手册的5.2章节。
代码实现:
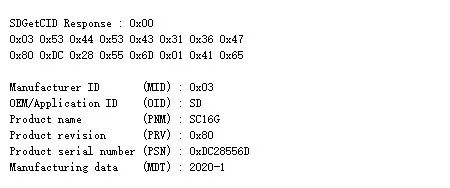
void SDGetCID(void){uint8_t CID[16], R1 = 0;R1 = SD_SendCommand(CMD10, 0x00000000);while (SD_SPI_ReadWriteByte(0xFF) != 0xFE){__ASM("nop");}for (uint8_t i = 0; i < 16; i++){CID[i] = SD_SPI_ReadWriteByte(0xFF);}SD_SPI_ReadWriteByte(0xFF);SD_SPI_ReadWriteByte(0xFF);printf("\r\n");printf("\r\n%s Response : 0x%02X", __FUNCTION__, R1);for (uint8_t i = 0; i < 16; i++){if ((i % 8) == 0){printf("\r\n");}printf("0x%02X ", CID[i]);}printf("\r\n");printf("\r\nManufacturer ID (MID) : 0x%02X", SD_GetField(CID, sizeof(CID), 8, 120));printf("\r\nOEM/Application ID (OID) : %c%c", SD_GetField(CID, sizeof(CID), 8, 112),SD_GetField(CID, sizeof(CID), 8, 104));printf("\r\nProduct name (PNM) : %c%c%c%c%c", SD_GetField(CID, sizeof(CID), 8, 96),SD_GetField(CID, sizeof(CID), 8, 88),SD_GetField(CID, sizeof(CID), 8, 80),SD_GetField(CID, sizeof(CID), 8, 72),SD_GetField(CID, sizeof(CID), 8, 64));printf("\r\nProduct revision (PRV) : 0x%02X", SD_GetField(CID, sizeof(CID), 8, 56));printf("\r\nProduct serial number (PSN) : 0x%X", SD_GetField(CID, sizeof(CID), 32, 24));printf("\r\nManufacturing data (MDT) : 20%02d-%d", SD_GetField(CID, sizeof(CID), 8, 12),SD_GetField(CID, sizeof(CID), 4, 8));}
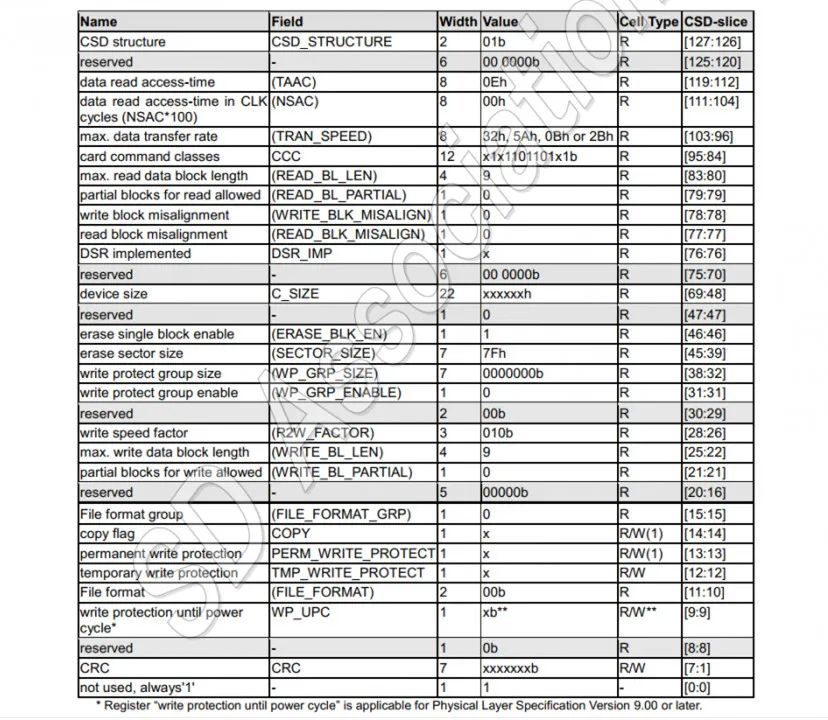
uint32_t SD_GetField(uint8_t *Source, uint8_t Length, uint8_t Width, uint8_t Start){uint32_t Value = 0, Index = 0, Offset = 0, BitValue = 0;for (uint8_t i = 0; i < Width; i++){Index = (Start + i) / 8;Offset = (Start + i) % 8;BitValue = (Source[(Length - 1) - Index] >> Offset) & 1;Value |= BitValue << i;}return Value;}void SDGetCSD(void){uint8_t CSD[16], R1 = 0;R1 = SD_SendCommand(CMD9, 0x00000000);while (SD_SPI_ReadWriteByte(0xFF) != 0xFE){__ASM("nop");}for (uint8_t i = 0; i < 16; i++){CSD[i] = SD_SPI_ReadWriteByte(0xFF);}SD_SPI_ReadWriteByte(0xFF);SD_SPI_ReadWriteByte(0xFF);printf("\r\n");printf("\r\n%s Response : 0x%02X", __FUNCTION__, R1);for (uint8_t i = 0; i < 16; i++){if ((i % 8) == 0){printf("\r\n");}printf("0x%02X ", CSD[i]);}printf("\r\n");uint32_t CSD_STRUCTURE = SD_GetField(CSD, sizeof(CSD), 2, 126);switch(CSD_STRUCTURE){case 0:printf("\r\nCSD Version 1.0 : Standard Capacity");break;case 1:printf("\r\nCSD Version 2.0 : High Capacity and Extended Capacity");printf("\r\n");printf("\r\ndata read access-time (TAAC) : 0x%02X", SD_GetField(CSD, sizeof(CSD), 8, 112));printf("\r\ndata read access-time in CLK cycles (NSAC) : 0x%02X", SD_GetField(CSD, sizeof(CSD), 8, 104));printf("\r\nmax. data transfer rate (TRAN_SPEED) : 0x%02X", SD_GetField(CSD, sizeof(CSD), 8, 96));printf("\r\ncard command classes (CCC) : 0x%X", SD_GetField(CSD, sizeof(CSD), 12, 84));printf("\r\nmax. read data block length (READ_BL_LEN) : %d, %0.0f Byte", SD_GetField(CSD, sizeof(CSD), 4, 80), pow(2, SD_GetField(CSD, sizeof(CSD), 4, 80)));printf("\r\npartial blocks for read allowed (READ_BL_PARTIAL) : %d", SD_GetField(CSD, sizeof(CSD), 1, 79));printf("\r\nwrite block misalignment (WRITE_BLK_MISALIGN): %d", SD_GetField(CSD, sizeof(CSD), 1, 78));printf("\r\nread block misalignment (READ_BLK_MISALIGN) : %d", SD_GetField(CSD, sizeof(CSD), 1, 77));printf("\r\nDSR implemented (DSR_IMP) : %d", SD_GetField(CSD, sizeof(CSD), 1, 76));printf("\r\ndevice size (C_SIZE) : %d", SD_GetField(CSD, sizeof(CSD), 22, 48));printf("\r\nerase single block enable (ERASE_BLK_EN) : %d", SD_GetField(CSD, sizeof(CSD), 1, 46));printf("\r\nerase sector size (SECTOR_SIZE) : %d, %d KB", SD_GetField(CSD, sizeof(CSD), 7, 39), 512 * (SD_GetField(CSD, sizeof(CSD), 7, 39) + 1) / 1024);printf("\r\nwrite protect group size (WP_GRP_SIZE) : %d", SD_GetField(CSD, sizeof(CSD), 7, 32));printf("\r\nwrite protect group enable (WP_GRP_ENABLE) : %d", SD_GetField(CSD, sizeof(CSD), 1, 31));printf("\r\nwrite speed factor (R2W_FACTOR) : %d", SD_GetField(CSD, sizeof(CSD), 3, 26));printf("\r\nmax. write data block length (WRITE_BL_LEN) : %d, %0.0f Byte", SD_GetField(CSD, sizeof(CSD), 4, 22), pow(2, SD_GetField(CSD, sizeof(CSD), 4, 22)));printf("\r\npartial blocks for write allowed (WRITE_BL_PARTIAL) : %d", SD_GetField(CSD, sizeof(CSD), 1, 21));printf("\r\nFile format group (FILE_FORMAT_GRP) : %d", SD_GetField(CSD, sizeof(CSD), 1, 15));printf("\r\ncopy flag (COPY) : %d", SD_GetField(CSD, sizeof(CSD), 1, 14));printf("\r\npermanent write protection (PERM_WRITE_PROTECT): %d", SD_GetField(CSD, sizeof(CSD), 1, 13));printf("\r\ntemporary write protection (TMP_WRITE_PROTECT) : %d", SD_GetField(CSD, sizeof(CSD), 1, 12));printf("\r\nFile format (FILE_FORMAT) : %d", SD_GetField(CSD, sizeof(CSD), 2, 10));printf("\r\nwrite protection until power cycle (WP_UPC) : %d", SD_GetField(CSD, sizeof(CSD), 1, 9));printf("\r\n");printf("\r\nMemory capacity = (C_SIZE + 1) * 512KByte = %0.3fGB", (double)(SD_GetField(CSD, sizeof(CSD), 22, 48) + 1) * 512 * 1024 / 1024 / 1024 / 1024);break;case 2:printf("\r\nCSD Version 3.0 : Ultra Capacity(SDUC)");break;case 3:printf("\r\nReserved");break;default:break;}}
运行结果:
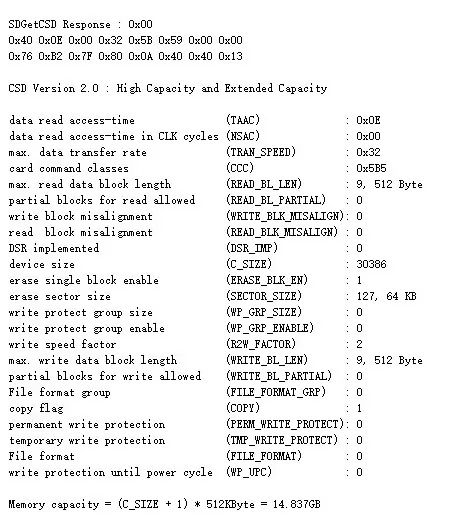
SPI模式下SD支持的命令有很多,但并不是都需要实现的。为了减少不必要的代码,我们仅实现有需要的部分,比如初始化部分的CMD0、CMD8、CMD55、CMD58、ACMD41等,以及在后面对SD卡读写操作的CMD17、CMD24等;而对于获取SD卡的CID、CSD信息的命令,则是可以省略不需要实现的。
六、Petit FAT移植
Petit FAT移植都统一在diskio.c文件中实现,diskio.c文件中提供了3个接口函数,分别为disk_initialize、disk_readp、disk_writep。接下来,我们对这3个函数进行说明和移植。
6.1 disk_initialize
这个函数是初始化SD卡存储设备的,就是SD卡的初始化流程,我们可以把SD_Init函数放到此处调用。这个函数是在调用pf_mount挂载设备时,进行初始化调用的,具体实现如下所示:
/*** [url=home.php?mod=space&uid=247401]@brief[/url] Initialize Disk Drive*/DSTATUS disk_initialize(void){DSTATUS stat;// Put your code herestat = SD_Init();return (stat);}
/*** [url=home.php?mod=space&uid=247401]@brief[/url] Read Partial Sector* @param buff : Pointer to the destination object* @param sector : Sector number (LBA)* @param offset : Offset in the sector* @param count : Byte count (bit15:destination)*/DRESULT disk_readp(BYTE *buff, DWORD sector, UINT offset, UINT count){DRESULT res;// Put your code hereres = RES_ERROR;if (SD_SendCommand(CMD17, sector) == 0){while (SD_SPI_ReadWriteByte(0xFF) != 0xFE){__ASM("nop");}for (UINT i = 0; i < offset; i++){SD_SPI_ReadWriteByte(0xFF);}if (buff){for (UINT i = 0; i < count; i++){buff[i] = SD_SPI_ReadWriteByte(0xFF);}}else{for (UINT i = 0; i < count; i++){SD_SPI_ReadWriteByte(0xFF);}}for (UINT i = 0; i < (512 + 2 - offset - count); i++){SD_SPI_ReadWriteByte(0xFF);}res = RES_OK;}#if 0printf("\r\n%s sector = %d, offset = %d, count = %d", __FUNCTION__, sector, offset, count);printf("\r\n Offset 0 1 2 3 4 5 6 7 8 9 A B C D E F");for (UINT i = 0; i < offset % 16; i++){if ((i % 16) == 0){printf("\r\n%09X ", sector * 512 + ((offset + 0) / 16) * 16);}printf(" ");}for (UINT i = 0; i < count; i++){if (((offset + i) % 16) == 0){printf("\r\n%09X ", sector * 512 + ((offset + i) / 16) * 16);}printf("%02X ", buff[i]);}printf("\r\n");#endifreturn (res);}
6.3 disk_writep
这个函数是把数据写入到扇区,这个函数仅有两个参数,分别为buff和sc。这个需要应用搭配来使用:当buff为空指针时,如果sc为0表示数据包写完了,此时进行结束处理操作流程;如果sc不为0表示即将开始写入数据操作,此时sc表示扇区地址,就做好准备;当buff不为空指针时,此时进行数据写入操作,sc表示当前要写入的数据个数。
在实现这个函数时,通过调用SPI模式下的CMD24命令,CMD24是写入一个完整扇区数据。所以,当写入扇区的数据量不满1个扇区字节时,是需要补充写完整的,具体的移植代码如下所示:
/*** [url=home.php?mod=space&uid=247401]@brief[/url] Write Partial Sector* @param buff : Pointer to the data to be written, NULL:Initiate/Finalize write operation* @param sc : Sector number (LBA) or Number of bytes to send*/DRESULT disk_writep(const BYTE *buff, DWORD sc){DRESULT res;static DWORD bw = 0;res = RES_ERROR;if (!buff){if (sc){// Initiate write processif (SD_SendCommand(CMD24, sc) == 0){SD_SPI_ReadWriteByte(0xFF);SD_SPI_ReadWriteByte(0xFE);bw = 512 + 2; /* BLOCKLEN + CRC16 */res = RES_OK;#if 0printf("\r\n%s Initiate, sc = %5d, bw = %d", __FUNCTION__, sc, bw);#endif}}else{// Finalize write processfor (DWORD i = 0; i < bw; i++){SD_SPI_ReadWriteByte(0x00);}/* Wait Data accepted */while ((SD_SPI_ReadWriteByte(0xFF) & 0x1F) != 0x05){__ASM("nop");}while (SD_SPI_ReadWriteByte(0xFF) == 0x00){__ASM("nop");}res = RES_OK;#if 0printf("\r\n%s Finalize, sc = %d, bw = %d", __FUNCTION__, sc, bw);#endif}}else{// Send data to the diskfor (DWORD i = 0; i < sc; i++){SD_SPI_ReadWriteByte(buff[i]);}bw = bw - sc;res = RES_OK;#if 0printf("\r\n%s SendData, sc = %d, bw = %d", __FUNCTION__, sc, bw);#endif}return (res);}
在pffconf.h文件中,是关于Petit FAT的配置,其中有功能函数的使能开关、FAT支持的格式选择,以及PF_USE_LCC这个宏的配置。下表显示了通过配置选项删除了哪些功能以减少代码空间:
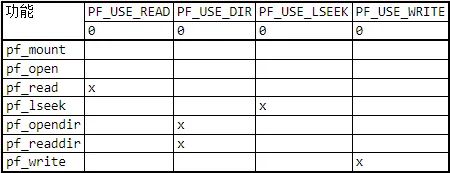
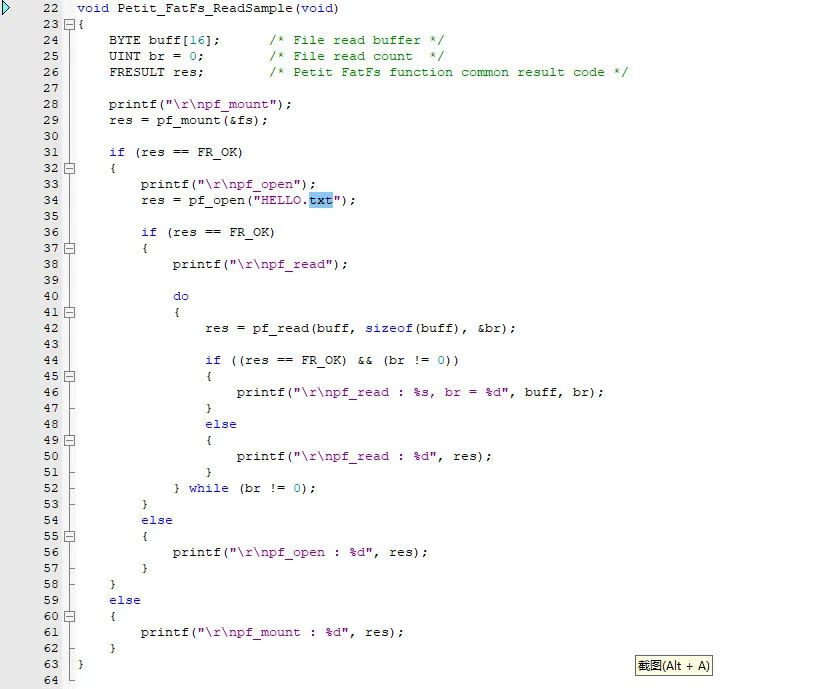
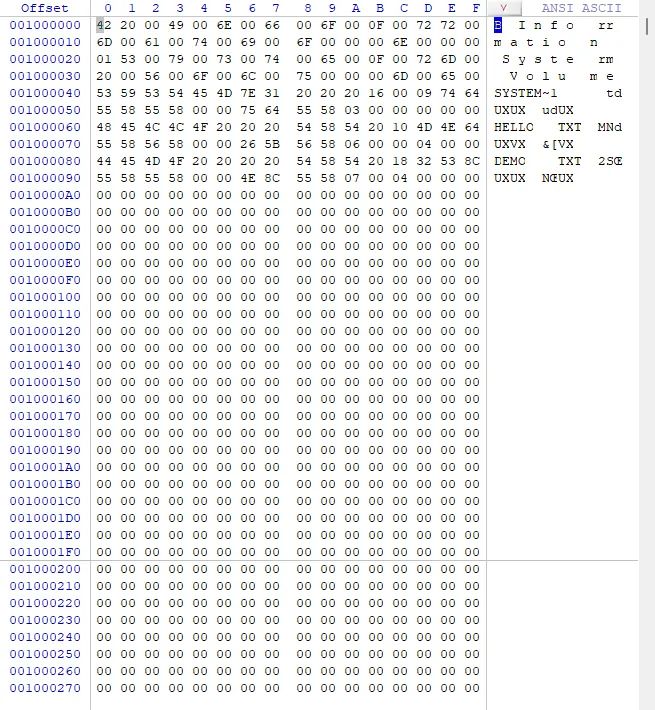
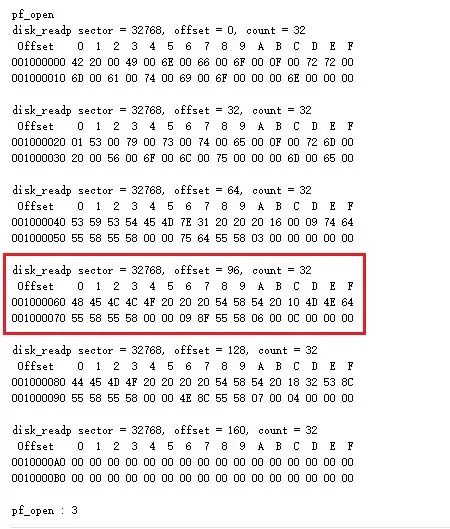
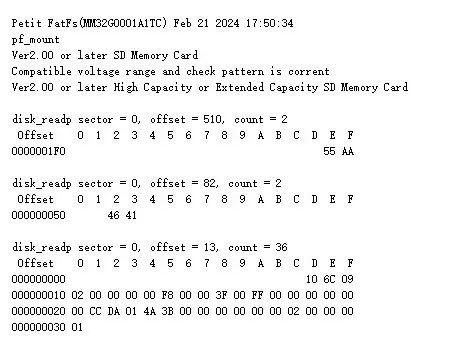
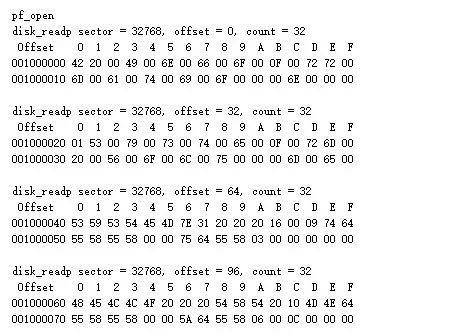
这里着重说一下PF_USE_LCC这个宏,这边是在调试的时候趟过的坑^^,其默认值为0;当SD卡中的文件名为“HELLO.txt”时,我在使用pf_open函数打开这个文件会提示:FR_NO_FILE,其原因是因为在SD卡的根目录中,所有的文件名和文件后缀名都是大写的,当使用"HELLO.txt"和“HELLO.TXT”进行文本比较时,肯定不会匹配通过,所以解决办法有两个:一是将PF_USE_LCC的宏值修改为1;二是在pf_open打开文件时,将文件名和文件后缀名都改为大写。
八、Petit FAT示例
在完成移植和配置后,我们就可以对TF卡中的文件进行读写了,编写一个读写文件的示例函数,如下所示:
FATFS fs; /* Work area (file system object) for the volume */void Petit_FatFs_Sample(void){BYTE buff[16]; /* File read/write buffer */UINT br = 0; /* File read count */UINT bw = 0; /* File write count */FRESULT res; /* Petit FatFs function common result code */printf("\r\n");printf("\r\n%s", __FUNCTION__);printf("\r\n");res = pf_mount(&fs);if (res == FR_OK){printf("\r\npf_mount successed");printf("\r\n------------------------------pf_write------------------------------");res = pf_open("HELLO.TXT");if (res == FR_OK){printf("\r\npf_open successed");memset(buff, 0, sizeof(buff));memcpy(buff, "Hello", 5);res = pf_lseek(fs.fptr + 0);printf("\r\npf_lseek : %d, ofs = %d", res, 0);res = pf_write(buff, strlen((char *)buff), &bw);printf("\r\npf_write : %d, bw = %d,", res, bw);/* Finalize the current write operation */res = pf_write(0, 0, &bw);printf("\r\npf_write : %d, bw = %d,", res, bw);memset(buff, 0, sizeof(buff));memcpy(buff, "World", 5);res = pf_lseek(fs.fptr + 512);printf("\r\npf_lseek : %d, ofs = %d", res, 512);res = pf_write(buff, strlen((char *)buff), &bw);printf("\r\npf_write : %d, bw = %d,", res, bw);/* Finalize the current write operation */res = pf_write(0, 0, &bw);printf("\r\npf_write : %d, bw = %d,", res, bw);}else{printf("\r\npf_open : %d", res);}printf("\r\n------------------------------pf_read------------------------------");res = pf_open("HELLO.TXT");if (res == FR_OK){printf("\r\npf_open successed");do{res = pf_read(buff, sizeof(buff), &br);if ((res == FR_OK) && (br != 0)){printf("\r\npf_read : %s, br = %d", buff, br);}else{printf("\r\npf_read : %d", res);}} while (br != 0);}else{printf("\r\npf_open : %d", res);}}else{printf("\r\npf_mount : %d", res);}}
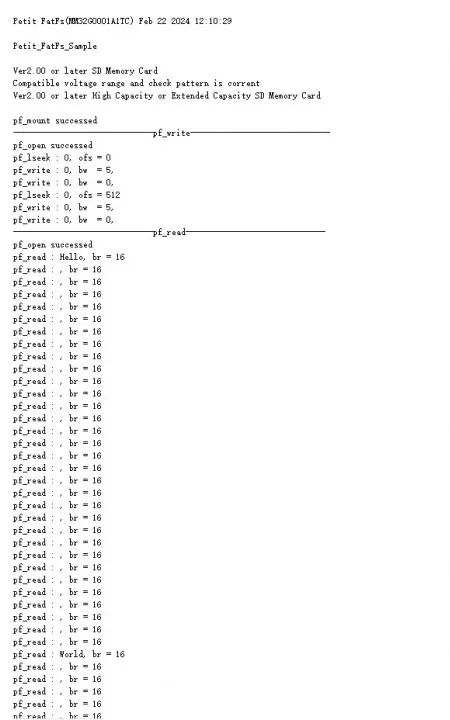
pf_lseek(ofs)在启动定稿操作之前,必须将读/写指针移动到扇区边界,否则它将在第一次定稿操作时向下舍入到扇区边界;
pf_write(buff, btw, &bw)启动写入操作,将第一批数据写入文件;
pf_write(buff, btw, &bw)写入下一批数据,在进行写入操作时,不能使用任何其它文件函数;
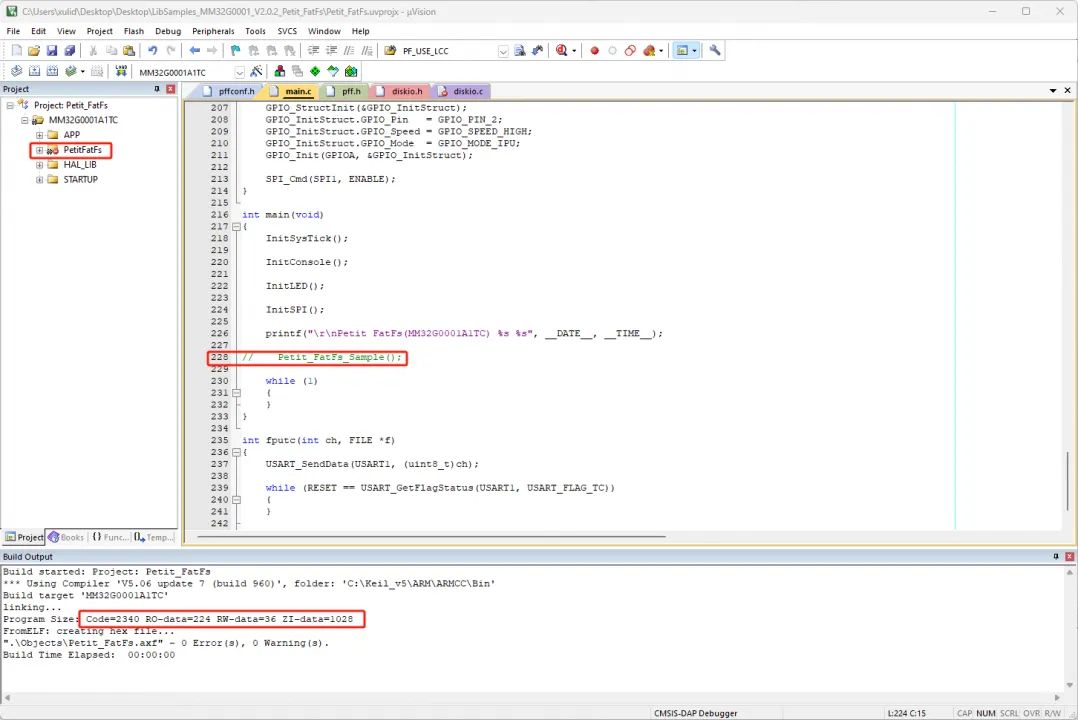
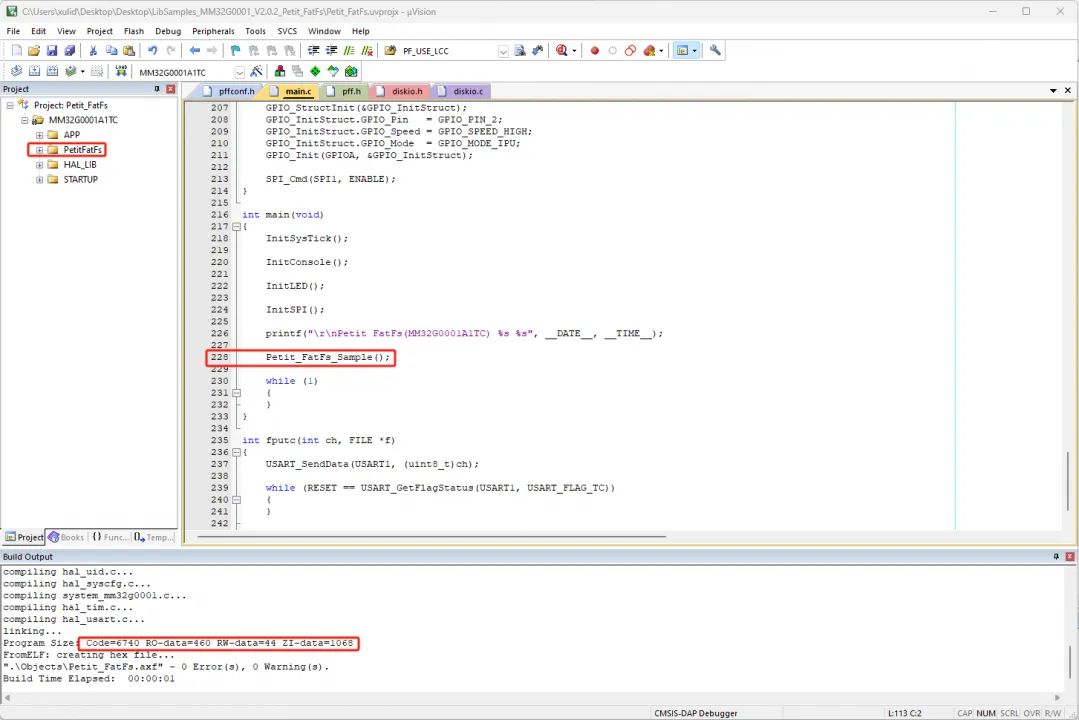
十、程序空间编译比较
没有添加Petit FAT时:
添加Petit FAT示例后:
十一、附件
Petit FAT读写示例程序(6.17MB)
以上就是今天的分享,如果有需要查看原图、代码、附件的小伙伴,请点击底部“阅读原文”进行下载。

END