作者:Shaoyi Chen,AMD工程师;来源:AMD开发者社区
近年来,深度学习框架的快速发展使得人工智能应用领域取得了巨大的进步。其中,Caffe框架以其简单易用、高效快速的特点受到了广泛关注和应用。然而,随着Vitis-AI 2.0的推出,Caffe框架的支持也宣告结束,这引起了许多开发者的关注和讨论。
Caffe框架的简介
首先,让我们简要介绍一下Caffe框架。Caffe是由伯克利视觉与学习中心(Berkeley Vision and Learning Center)开发的一个深度学习框架,以其速度快、配置简单、易于扩展等特点而广受欢迎。其采用了C++语言编写,支持命令行界面和Python接口,使得用户可以轻松地定义、训练和部署各种深度学习模型。
Vitis-AI 2.0之后对Caffe的支持终止
然而,随着Xilinx推出Vitis-AI 2.0,Caffe框架的支持也随之终止。这一决定引起了广泛的讨论和反响。一些开发者表示担忧,担心他们之前基于Caffe框架开发的项目将受到影响,而另一些人则认为这是迈向更先进、更高效的深度学习框架的必然选择。
Model Zoo中的训练好的模型
尽管Caffe框架的支持终止了,但在其官方的Model Zoo中仍然存在大量经过训练的模型,涵盖了各种各样的应用场景,如图像分类、目标检测、语义分割等。这些预训练的模型可以为开发者提供便利,节省大量的训练时间和资源,使得他们能够更快地搭建和部署深度学习模型。
Vitis-AI 3.0对Caffe模型的非官方支持
尽管在Vitis-AI 3.0中官方已经不再支持Caffe框架,但开发者仍然可以继续使用这些Caffe模型。虽然这并不是官方支持的流程,但通过一些额外的工作,开发者仍然可以成功地在Vitis-AI 3.0中调用和部署这些模型。
通过人脸检测实验展示如何调用Caffe模型
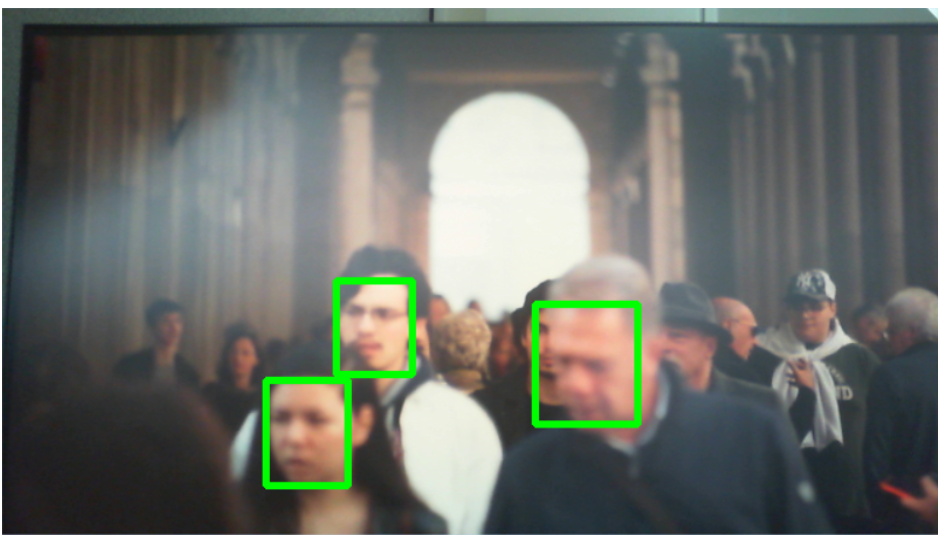
为了更具体地展示如何在Vitis-AI 3.0中调用Caffe模型,我们将进行一个简单的人脸检测实验。首先,我们需要选择一个合适的Caffe模型,如densebox320人脸检测模型。然后,我们需要将该模型转换成Vitis-AI 3.0支持的格式,并对其进行部署和调用。最后,我们可以通过USB摄像头输入一张人脸图像,观察模型的输出结果,验证其在人脸检测任务上的性能和准确性。
在代码中我们创建DPU runner,从摄像头读取图像并用DPU进行推理计算,然后进行后处理,并通过X11转发画面。
def detect():resolution = 4threshold = 0.9nms_threshold = 0.3g = xir.Graph.deserialize("../densebox320/densebox320.xmodel")subgraphs = get_child_subgraph_dpu(g)assert len(subgraphs) == 1 # only one DPU kerneldpu_runner = vart.Runner.create_runner(subgraphs[0], "run")camera = cv2.VideoCapture(0)width = 640height = 360camera.set(cv2.CAP_PROP_FRAME_WIDTH,width)camera.set(cv2.CAP_PROP_FRAME_HEIGHT,height)while True:image_ori) = camera.read()imagePad = padProcess(image_ori)image = cv2.resize(imagePad,(32*int(320/32), 32*int(320/32)), interpolation = cv2.INTER_CUBIC)szs = (float(imagePad.shape[0])/float(image.shape[0]), float(imagePad.shape[1])/float(image.shape[1]))sz = image.shapeimage = image.astype(np.float)image = image - 128# image = np.transpose(image, (2, 0, 1))output = rundensebox(image, dpu_runner)# generate resultprob = output[1][0, ..., 1]bb = output[0][0, ...]bb = np.transpose(bb, (2, 0, 1))gy = np.arange(0, sz[0], resolution)gx = np.arange(0, sz[1], resolution)y] = np.meshgrid(gx, gy):, :] = bb[0, :, :] + x:, :] = bb[0, :, :] * szs[1]:, :] = bb[1, :, :] + y:, :] = bb[1, :, :] * szs[0]:, :] = bb[2, :, :] + x:, :] = bb[2, :, :] * szs[1]:, :] = bb[3, :, :] + y:, :] = bb[3, :, :] * szs[0]bb = np.reshape(bb, (4, -1)).Tprob = np.reshape(prob, (-1, 1))bb = bb[prob.ravel() > threshold, :]prob = prob[prob.ravel() > threshold, :]# nmsrects = np.hstack((bb, prob))keep = nms(rects, nms_threshold)rects = rects[keep, :]# write result to filefor rect in rects:cv2.rectangle(image_ori,(int(rect[0]),int(rect[1])),(int(rect[2]),int(rect[3])),(0,255,0),3)image_ori)camera.release()cv2.destroyAllWindows()
DPU的调用由rundensebox来执行。
def rundensebox(img, dpu_runner):"""get tensor"""inputTensors = dpu_runner.get_input_tensors()outputTensors = dpu_runner.get_output_tensors()input_ndim = tuple(inputTensors[0].dims)# print(input_ndim)input_fixpos = inputTensors[0].get_attr("fix_point")input_scale = 2**input_fixposoutput_ndim_0 = tuple(outputTensors[0].dims)# print(output_ndim_0)output_ndim_1 = tuple(outputTensors[1].dims)# print(output_ndim_1)output_fixpos_0 = outputTensors[0].get_attr("fix_point")output_scale_0 = 1 / (2**output_fixpos_0)output_fixpos_1 = outputTensors[1].get_attr("fix_point")output_scale_1 = 1 / (2**output_fixpos_1)imgquant = img * input_scalerunSize = input_ndim[0]"""prepare batch input/output """inputData = [np.empty(input_ndim, dtype=np.int8, order="C")]outputData = [np.empty(output_ndim_0, dtype=np.int8, order="C"),np.empty(output_ndim_1, dtype=np.int8, order="C")]"""init input image to input buffer """imageRun = inputData[0]imageRun[0, ...] = imgquant.reshape(input_ndim[1:])"""run with batch """job_id = dpu_runner.execute_async(inputData, outputData)dpu_runner.wait(job_id)result = [outputData[0] * output_scale_0,outputData[1] * output_scale_1]return result
最后的显示结果如图所示。

结语
尽管Caffe框架在Vitis-AI 2.0之后的支持已经终止,但在Vitis-AI 3.0中仍然可以继续使用这些经过训练的Caffe模型。通过一些额外的工作和非官方的支持流程,开发者仍然可以成功地调用和部署这些模型,为各种应用场景提供强大的深度学习解决方案。
