相较于WiFi技术,低功耗蓝牙BLE技术具有搜索连接速度快、超低功耗等特点,BLE搭配mesh技术所延伸的蓝牙mesh技术因其支持多点对多点连接、物理覆盖区域广阔,也被广泛用于智能家居中控、智能安防、智慧楼宇等物联网设备上。
XR806是一款支持BLE 5.0、支持完整低功耗蓝牙服务GATT、支持SIG mesh完整协议栈的无线芯片,同样适配物联网设备的使用场景需求,在通过官方文档的指引下配置好XR806的RTOS环境后,可按文章介绍步骤进行后续的蓝牙mesh互传及蓝牙单向穿透的功能测试。

蓝牙mesh互传
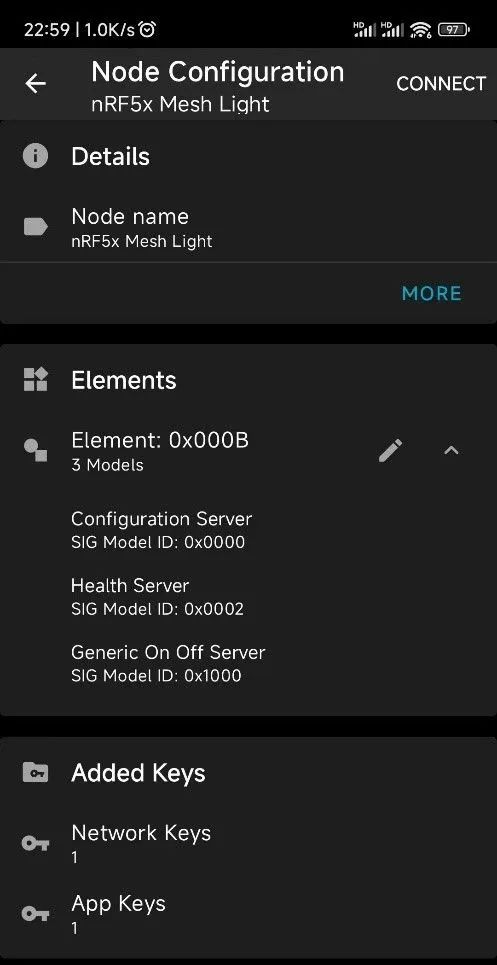
最新的蓝牙mesh1.1引入了定向转发路由功能,扩大射频覆盖范围,使信号一级级中继下去,手头有nRF52840开发板,不妨和全志XR806进行组网,测试兼容性和互操作性,也验证XR806 mesh协议栈的完成度。先看效果:

nRF52840用Segger Embedded Studio打开工程:
nrf5SDKforMeshv320src\examples\light_switch\server同时烧录协议栈和APP;XR806为观察到现象,将mesh例程的收到mesh opcode的回调接口加个指示信号,具体为:
static void gpio_output_init(void){GPIO_InitParam param;param.driving = GPIO_DRIVING_LEVEL_1;param.mode = GPIOx_Pn_F1_OUTPUT;param.pull = GPIO_PULL_NONE;HAL_GPIO_Init(GPIO_OUTPUT_PORT, GPIO_OUTPUT_PIN, ¶m);//PA21}/***************Onoff Configuration Declaration*******************/static void app_onoff_srv_set_cb(const struct bt_mesh_model *model, uint8_t onoff, uint8_t target_onoff, const struct bt_mesh_transition_status *opt){g_onoff_value = onoff;HAL_GPIO_WritePin(GPIO_OUTPUT_PORT, GPIO_OUTPUT_PIN, onoff ? GPIO_PIN_HIGH : GPIO_PIN_LOW);printf("[app] onoff set(%d)", onoff);if (opt) {printf("target onoff(%d), total_steps(%d), steps(%d)",target_onoff, opt->total_steps, opt->present_steps);}printf("\n");}
编译完后将mesh_demo烧录进XR806中,将XR806的GenericOnOff Server订阅到publisher的发布地址,就能实现同一网络(具备同一网络密钥可以正确解析出mesh消息)内的消息传递。
此时用nRF Mesh去给nRF52840和XR806分别入网和设置订阅地址,本次将他们订阅到0xC000。

由于入网过程没有录制下来,且XR806无法退网,且入网信息暂时没找到擦除方法,这样重新烧录还是保持入网状态而无法回到unprovisioned状态。
nRF52840接到JlinkRTT Viewer,XR806接到putty,可以看到XR806的Controller/host协议栈的版本信息,手机发布一条开关(由GernericOnOff元素统属)消息,泛洪给两台射频设备,可以在各自控制台看到都有收到set opcode网络消息。


蓝牙穿透(单向)
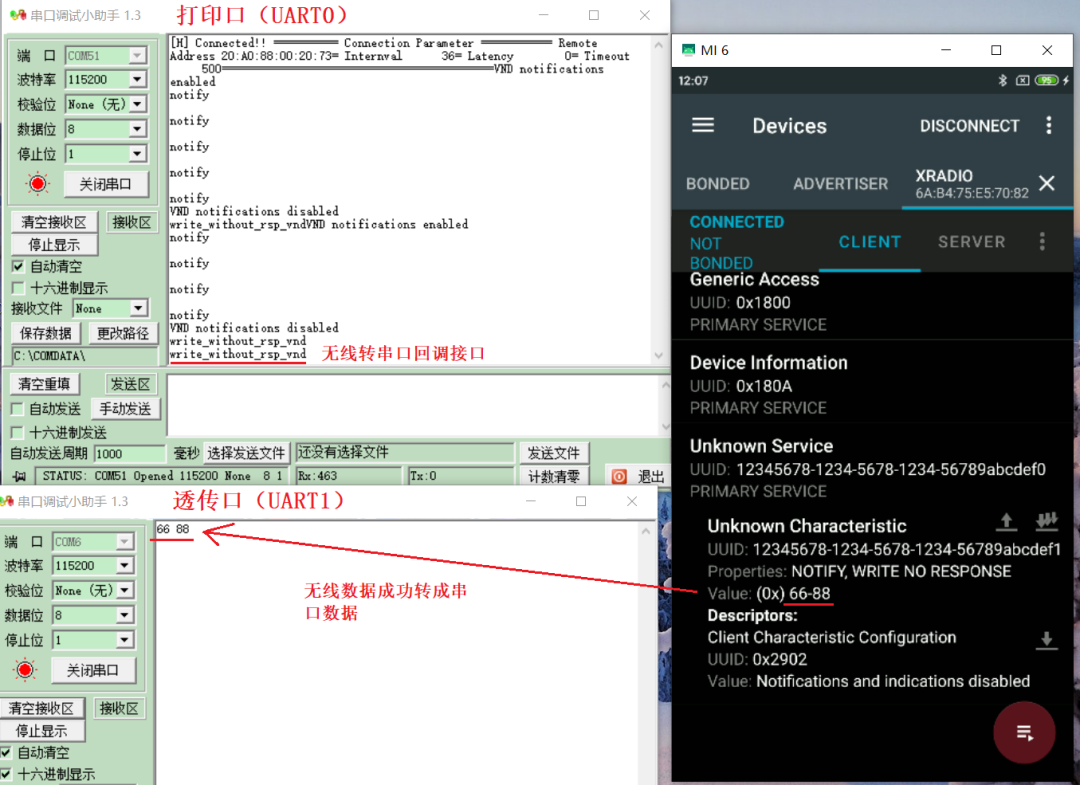
有时无线透传在无法布线时有很方便的效用,不妨试试蓝牙透传,效果如下:

具体是无线数据->串口数据,串口数据->无线数据,目前前者实现了,后者还有些问题未解决,

实现过程如下,基于工程:
demo/Bluetooth/peripheral_demo改成peripheral_uart_demo同时目录下文件里工程名也进行修改:
peripheral_uart_demo/gcc/defconfig改成peripheral_uart_demo然后引入串口读写独立接口即把demo/at_demo下的serial.c、serial.h、serial_debug.h复制到刚才peripheral_uart_demo工程下,由于要无线写以及串口写转无线,所以profile涉及到write_without_rsp和notify,具体配置为:
static struct bt_gatt_attr vnd_attrs[] = {/* Vendor Primary Service Declaration */BT_GATT_PRIMARY_SERVICE(&vnd_uuid),BT_GATT_CHARACTERISTIC(&vnd_enc_uuid.uuid,BT_GATT_CHRC_WRITE_WITHOUT_RESP | BT_GATT_CHRC_NOTIFY,BT_GATT_PERM_WRITE,NULL, write_without_rsp_vnd, &vnd_value),BT_GATT_CCC(vnd_ccc_notify_changed, BT_GATT_PERM_READ|BT_GATT_PERM_WRITE),};
写回调接口为:
/**********************vnd_write_cmd_uuid*****************************/static ssize_t write_without_rsp_vnd(struct bt_conn *conn,const struct bt_gatt_attr *attr,const void *buf, uint16_t len, uint16_t offset,uint8_t flags){uint8_t *value = attr->user_data;/* Write request received. Reject it since this char only accepts* Write Commands.*/if (!(flags & BT_GATT_WRITE_FLAG_CMD)) {return BT_GATT_ERR(BT_ATT_ERR_WRITE_REQ_REJECTED);}if (offset + len > sizeof(vnd_value)) {return BT_GATT_ERR(BT_ATT_ERR_INVALID_OFFSET);}memset(value, 0, sizeof(vnd_value));memcpy(value + offset, buf, len);serial_write(value + offset, len);*(value + offset + len) = '\0';printf("\r\nwrite_without_rsp_vnd");return len;}
串口转无线回调(有问题):
static void vnd_notify(void){static uint8_t vnd[MAX_LONG_DATA];uint16_t len=0;if (!vnd_notif_enabled)return;printf("\r\nnotify\r\n");serial_read(vnd_notify_value,len);if(len>MAX_LONG_DATA || len==0)return;memcpy(vnd, vnd_notify_value, len);printf("\r\nvnd_notify\r\n");bt_gatt_notify(NULL, &vnd_svc.attrs[1], vnd, sizeof(vnd));}
然后在bt_app_init函数里加入透传口UART1的初始化代码即可:
serial_init(SERIAL_UART_ID, 115200, UART_DATA_BITS_8, UART_PARITY_NONE,UART_STOP_BITS_1, 0);serial_start();
-End-
本文转载自:https://bbs.aw-ol.com/topic/4548/
