作者:王博,极视角科技算法研究员
微信公众号:OpenCV学堂
关注获取更多计算机视觉与深度学习知识
简单说明
链接: https://pan.baidu.com/s/1FoC0n7qMz4Fz0RtDGpI6xQ密码: 7mhs
https://github.com/WongKinYiu/yolov7跟YOLOR是同一个作者的。
OpenCV+YOLOv7
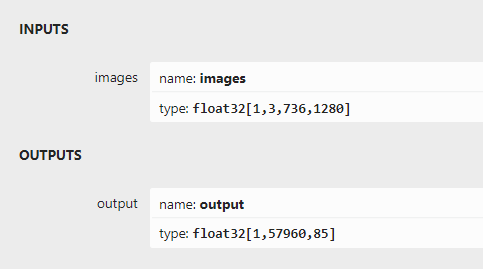
推理过程跟之前的YOLO系列部署代码可以大部分重用!这里就不在赘述了,详细看源码如下:输出部分直接解析最后一个输出层就好啦!

详细实现代码如下:
#include
#include
#include
#include
#include
#include

using namespace cv;
using namespace dnn;
using namespace std;

struct Net_config
{
    float confThreshold; // Confidence threshold
    float nmsThreshold;  // Non-maximum suppression threshold
    string modelpath;
};

class YOLOV7
{
public:
    YOLOV7(Net_config config);
    void detect(Mat& frame);
private:
    int inpWidth;
    int inpHeight;
    vector<string> class_names;
    int num_class;

    float confThreshold;
    float nmsThreshold;
    Net net;
    void drawPred(float conf, int left, int top, int right, int bottom, Mat& frame, int classid);
};

YOLOV7::YOLOV7(Net_config config)
{
    this->confThreshold = config.confThreshold;
    this->nmsThreshold = config.nmsThreshold;

    this->net = readNet(config.modelpath);
    ifstream ifs("coco.names");
    string line;
    while (getline(ifs, line)) this->class_names.push_back(line);
    this->num_class = class_names.size();

    size_t pos = config.modelpath.find("_");
    int len = config.modelpath.length() - 6 - pos;
    string hxw = config.modelpath.substr(pos + 1, len);
    pos = hxw.find("x");
    string h = hxw.substr(0, pos);
    len = hxw.length() - pos;
    string w = hxw.substr(pos + 1, len);
    this->inpHeight = stoi(h);
    this->inpWidth = stoi(w);
}

void YOLOV7::drawPred(float conf, int left, int top, int right, int bottom, Mat& frame, int classid)   // Draw the predicted bounding box
{
    //Draw a rectangle displaying the bounding box
    rectangle(frame, Point(left, top), Point(right, bottom), Scalar(0, 0, 255), 2);

    //Get the label for the class name and its confidence
    string label = format("%.2f", conf);
    label = this->class_names[classid] + ":" + label;

    //Display the label at the top of the bounding box
    int baseLine;
    Size labelSize = getTextSize(label, FONT_HERSHEY_SIMPLEX, 0.5, 1, &baseLine);
    top = max(top, labelSize.height);
    //rectangle(frame, Point(left, top - int(1.5 * labelSize.height)), Point(left + int(1.5 * labelSize.width), top + baseLine), Scalar(0, 255, 0), FILLED);
    putText(frame, label, Point(left, top), FONT_HERSHEY_SIMPLEX, 0.75, Scalar(0, 255, 0), 1);
}

void YOLOV7::detect(Mat& frame)
{
    Mat blob = blobFromImage(frame, 1 / 255.0, Size(this->inpWidth, this->inpHeight), Scalar(0, 0, 0), true, false);
    this->net.setInput(blob);
    vector outs;
    this->net.forward(outs, this->net.getUnconnectedOutLayersNames());

    int num_proposal = outs[0].size[0];
    int nout = outs[0].size[1];
    if (outs[0].dims > 2)
    {
        num_proposal = outs[0].size[1];
        nout = outs[0].size[2];
        outs[0] = outs[0].reshape(0, num_proposal);
    }
    /////generate proposals
    vector<float> confidences;
    vector boxes;
    vector<int> classIds;
    float ratioh = (float)frame.rows / this->inpHeight, ratiow = (float)frame.cols / this->inpWidth;
    int n = 0, row_ind = 0; ///cx,cy,w,h,box_score,class_score
    float* pdata = (float*)outs[0].data;
    for (n = 0; n < num_proposal; n++)   ///ÌØÕ÷ͼ³ß¶È
    {
        float box_score = pdata[4];
        if (box_score > this->confThreshold)
        {
            Mat scores = outs[0].row(row_ind).colRange(5, nout);
            Point classIdPoint;
            double max_class_socre;
            // Get the value and location of the maximum score
            minMaxLoc(scores, 0, &max_class_socre, 0, &classIdPoint);
            max_class_socre *= box_score;
            if (max_class_socre > this->confThreshold)
            {
                const int class_idx = classIdPoint.x;
                float cx = pdata[0] * ratiow;  ///cx
                float cy = pdata[1] * ratioh;   ///cy
                float w = pdata[2] * ratiow;   ///w
                float h = pdata[3] * ratioh;  ///h

                int left = int(cx - 0.5 * w);
                int top = int(cy - 0.5 * h);

                confidences.push_back((float)max_class_socre);
                boxes.push_back(Rect(left, top, (int)(w), (int)(h)));
                classIds.push_back(class_idx);
            }
        }
        row_ind++;
        pdata += nout;
    }

    // Perform non maximum suppression to eliminate redundant overlapping boxes with
    // lower confidences
    vector<int> indices;
    dnn::NMSBoxes(boxes, confidences, this->confThreshold, this->nmsThreshold, indices);
    for (size_t i = 0; i < indices.size(); ++i)
    {
        int idx = indices[i];
        Rect box = boxes[idx];
        this->drawPred(confidences[idx], box.x, box.y,
            box.x + box.width, box.y + box.height, frame, classIds[idx]);
    }
}

int main()
{
    Net_config YOLOV7_nets = { 0.3, 0.5, "models/yolov7_736x1280.onnx" };   ////choices=["models/yolov7_736x1280.onnx", "models/yolov7-tiny_384x640.onnx", "models/yolov7_480x640.onnx", "models/yolov7_384x640.onnx", "models/yolov7-tiny_256x480.onnx", "models/yolov7-tiny_256x320.onnx", "models/yolov7_256x320.onnx", "models/yolov7-tiny_256x640.onnx", "models/yolov7_256x640.onnx", "models/yolov7-tiny_480x640.onnx", "models/yolov7-tiny_736x1280.onnx", "models/yolov7_256x480.onnx"]
    YOLOV7 net(YOLOV7_nets);
    string imgpath = "images/dog.jpg";
    Mat srcimg = imread(imgpath);
    net.detect(srcimg);

    static const string kWinName = "Deep learning object detection in OpenCV";
    namedWindow(kWinName, WINDOW_NORMAL);
    imshow(kWinName, srcimg);
    waitKey(0);
    destroyAllWindows();
}
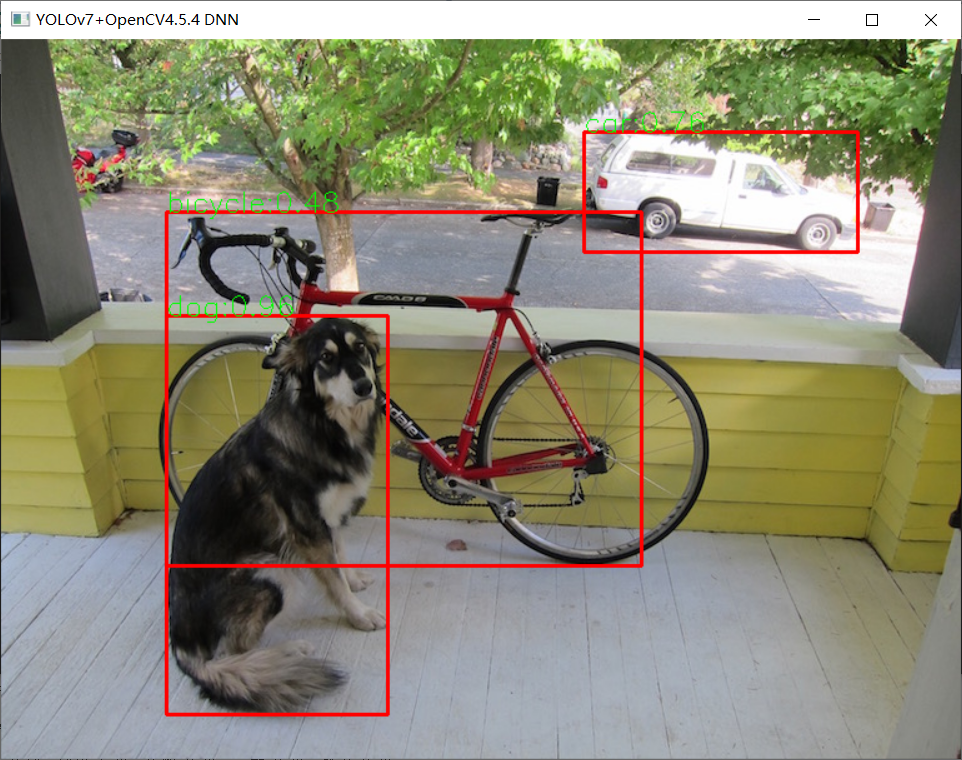
运行测试如下:


本文作者github主页:
https://github.com/hpc203/yolov7-opencv-onnxrun-cpp-py读书欲精不欲博
用心欲专不欲杂
扫码查看OpenCV+OpenVIO+Pytorch系统化学习路线图

推荐阅读
CV全栈开发者说 - 从传统算法到深度学习怎么修炼
2022入坑深度学习,我选择Pytorch框架!
Pytorch轻松实现经典视觉任务
教程推荐 | Pytorch框架CV开发-从入门到实战
OpenCV4 C++学习 必备基础语法知识三
OpenCV4 C++学习 必备基础语法知识二
OpenCV4.5.4 人脸检测+五点landmark新功能测试
OpenCV4.5.4人脸识别详解与代码演示
OpenCV二值图象分析之Blob分析找圆
OpenCV4.5.x DNN + YOLOv5 C++推理
OpenCV4.5.4 直接支持YOLOv5 6.1版本模型推理
OpenVINO2021.4+YOLOX目标检测模型部署测试
比YOLOv5还厉害的YOLOX来了,官方支持OpenVINO推理
